Angularjs UI-Router Nested Views with Asp.Net Core MVC Application
Angularjs UI-Router is still the best choice of developers for Routing Purpose. Even with powerful platforms like Asp.Net or Asp.Net Core when you need to load Nested Views and don’t want to reload your page every time then JavaScript’s Frameworks provide us the best Solution And Angular is one of them.
Although Asp.Net Core provides Angular Template, most of the developers use it for SPA(Single Page Application) purpose that is the reason that UI-Router is still active.
I’m going to create an Asp.Net Core Application with Angularjs UI-Router with nested Views. Here’s the sample structure I’m going to create
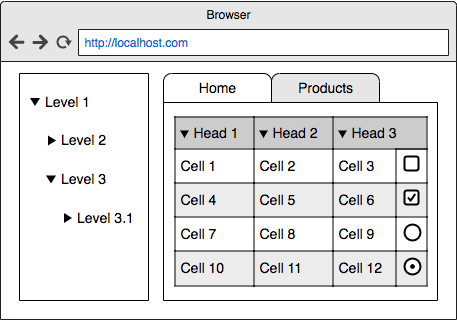
We’ll create the main menu on the left side part and the right side will be our content view. when clicking on the left side menu, the right side portion will be load including Tabs and when clicking on Tabs only inside portion will be loading not the complete right side. The animation below will make the right sense.
 I hope this will help you to better understand the nested views.
Now Let’s start coding.
First Create an Asp.Net Core Empty project
dotnet new web
First Let your Application know to use MVC & “wwwroot” directory in your Project.
So Add this Code in your “Startup.cs”
public void ConfigureServices(IServiceCollection services)
{
    services.AddMvc();
}

public void Configure(IApplicationBuilder app, IHostingEnvironment env)
{

    app.UseStaticFiles();

    app.UseMvc(routes =>
    {
        routes.MapRoute(
            name: "default",
            template: "{controller=Home}/{action=Index}/{id?}");
    });
}
Now create two new folders as Controllers & Views.
Now Create a Home Controller and a View as Index.cshtml
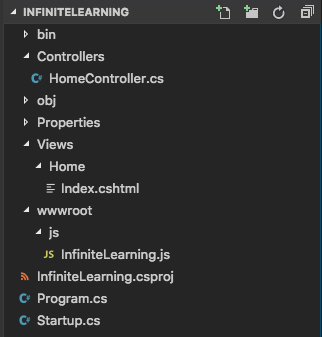
inside the wwwroot folder, create a folder named as js and create a javascript file there with the name of your project(In my case it’s InfiniteLearning.js)
after that, your structure will look like this.
Your HomeController should look like this
using System;
using Microsoft.AspNetCore.Mvc;
namespace LearningRouting.Controllers
{
    public class HomeController : Controller
    {
        public IActionResult Index()
        {
            return View();
        }
    }
}
Now add the code below in Index.cshtml View inside Home directory
<!DOCTYPE html>
<html ng-app="InfiniteLearning" lang="en">
<head>

    <title>Bootstrap Example</title>
    <meta charset="utf-8">
    <meta name="viewport" content="width=device-width, initial-scale=1">
    <link rel="stylesheet" href="https://maxcdn.bootstrapcdn.com/bootstrap/3.3.7/css/bootstrap.min.css">
    <script src="https://ajax.googleapis.com/ajax/libs/jquery/3.3.1/jquery.min.js"></script>
    <script src="https://maxcdn.bootstrapcdn.com/bootstrap/3.3.7/js/bootstrap.min.js"></script>

    <script src="https://code.angularjs.org/1.2.13/angular.js"></script>
    <script src="https://cdnjs.cloudflare.com/ajax/libs/angular-ui-router/0.4.2/angular-ui-router.min.js"></script>

    <script src="~/js/InfiniteLearning.js"></script>
</head>
<body>

    <div class="row" style="margin:30px;">
        <div class="col-sm-3">
            <h3>Main Menu</h3>
            <ul class="list-group">
                <li class="list-group-item"><a ui-sref="Students">Students</a></li>
                <li class="list-group-item"><a ui-sref="Teachers">Teachers</a></li>
            </ul>
        </div>
        <div class="col-sm-9">
            <div ui-view="container-view"></div>
        </div>
    </div>

</body>
</html>
Let’s Create Controllers and Views for Students and Teachers.
Create a new file inside Controllers folder named as “StudentsController.cs” and add this code
using System;
using Microsoft.AspNetCore.Mvc;

namespace LearningRouting.Controllers
{
    public class StudentsController : Controller
    {
        public IActionResult Index()
        {
            return View();
        }

        public IActionResult AllStudents()
        {
            return View();
        }

        public IActionResult Result()
        {
            return View();
        }
    }
}
Now create Students folder inside Views and create three files there as “Index.cshtml”, “AllStudents.cshtml” & “Result.cshtml”
The index file is actually the template file here for the Right side view. I just added two tabs in this file, you may use your own structure.
Index.cshtml
Below is the code for Index.cshtml.
<ul class="nav nav-tabs">
    <li><a ui-sref="Students">All Students</a></li>
    <li><a ui-sref="Students.Result">Result</a></li>
</ul>
<div ui-view="right-view"></div>
in “AllStudents.cshtml” & “Result.cshtml” you can add any text or html.
Now do the same thing for Teachers.
Create a Controller as “TeachersController.cs” with this Code
using System;
using Microsoft.AspNetCore.Mvc;

namespace LearningRouting.Controllers
{
    public class TeachersController : Controller
    {
        public IActionResult Index()
        {
            return View();
        }

        public IActionResult AllTeachers()
        {
            return View();
        }

        public IActionResult Courses()
        {
            return View();
        }
    }
}
Now three Views as “Index.cshtml”, “AllTeachers.cshtml” & “Courses.cshtml”
Here’s the Code for Index.cshtml for Teachers
<ul class="nav nav-tabs">
    <li><a ui-sref="Teachers">All Teachers</a></li>
    <li><a ui-sref="Teachers.Courses">Courses</a></li>
</ul>
<div ui-view="right-view"></div>
Your Structure now will look something like this
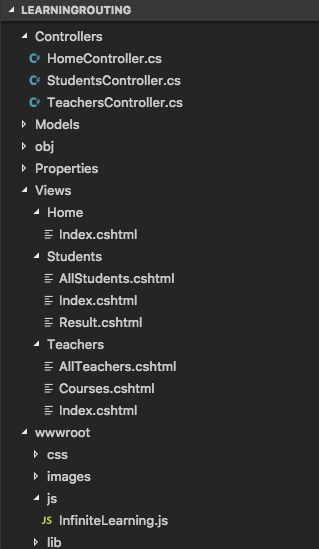
Now It comes to the most Important code which is for Routing
open the InfiniteLearning.js file that we created in the start and put this routing code there
var app = angular.module('InfiniteLearning', ['ui.router']);

app.config(function ($stateProvider, $urlRouterProvider) {

    // For any unmatched URL redirect to dashboard URL
    $urlRouterProvider.otherwise("Students");

    $stateProvider

        .state('Students', {
            url: "/Students",
            views: {
                'container-view': {
                    templateUrl:"Students/Index"
                },
                'right-view@Students' :{
                    templateUrl:"Students/AllStudents"
                }
            }
        })
        .state('Students.Result', {
            url: "/Result",
            views: {
                'container-view': {
                     templateUrl:"Students/Index"
                },
                'right-view@Students' :{
                    templateUrl: "Students/Result"
                }
            }
        })

        .state('Teachers', {
            url: "/Teachers",
            views: {
                'container-view': {
                    templateUrl:"Teachers/Index"
                },
                'right-view@Teachers' :{
                    templateUrl:"Teachers/AllTeachers"
                }
            }
        })
        .state('Teachers.Courses', {
            url: "/Courses",
            views: {
                'container-view': {
                     templateUrl:"Teachers/Index"
                },
                'right-view@Teachers' :{
                    templateUrl: "Teachers/Courses"
                }
            }
        });
});
All Done. Now run your app & Comment if you find any difficulty.
You can also download the complete project.

