
Explore How Kotlin Coroutine Works Under The Hood
In the ? hype of async programming, everyone is talking about Kotlin Coroutine. I know there are so much great articles on how to work with kotlin coroutines that’s why we gonna dive deep and see how the coroutines work under the hood. Kotlin Coroutine is a great and powerful language feature that’s why I think intro on the coroutines is necessary.
Brief Intro On Kotlin Coroutine
Kotlin coroutine is a way of doing things asynchronously in a sequential manner. Creating a coroutine is a lot cheaper vs creating a thread.
“In Kotlin Coroutine Structure Of [Imperative], Synchronous Code is the same as Asynchronous Code.” By Venkat Subramariam
In order to do asynchronous programming, you may have had to use Tasks, Threads, Executors, Callbacks or even RxJava. Although RxJava has a large number of combinators, various operators, operators chaining but the downside of this you’ve to have a quite steep learning curve to understand the way asynchronous work.
Kotlin coroutine is one the “biggest feature ” as indicated by the following quote taken from JetBrain’s blog.
We all know that blocking is bad under a high load, that polling is a no-go, and the world is becoming more and more push-based and asynchronous. Many languages (starting with C# in 2012) support asynchronous programming through dedicated language constructs such as async/await keywords. In Kotlin, we generalized this concept so that libraries can define their versions of such constructs, and async is not a keyword, but merely a function.
This design allows the integration of different asynchronous APIs: futures/promises, callback-passing, etc. It is also general enough to express lazy generators (yield) and cover some other use cases.
Adding Coroutine In Project
Kotlin coroutine in a project is very simple and also you need to enable it in your project. Since they are still an experimental mode, you may need to also include a few extra steps in your application level build.gralde file.
To begin to add the following library into your build.gradle file.
dependencies {
    implementation 'org.jetbrains.kotlinx:kotlinx-coroutines-android:0.26.1'
}
You’ll also need to add the following lines to your gradle file.
kotlin {
    experimental {
        coroutines "enable"
    }
}
Now if you’re working with pom add the dependency in your pom.xml file.
<dependencies>
          <dependency>
            <groupId>org.jetbrains.kotlinx</groupId>
            <artifactId>kotlinx-coroutines-core</artifactId>
            <version>0.23.4</version>
        </dependency>
............
<dependencies/>
Also, add the configuration for the experimental mode in your pom.xml file
<build>
    <plugin>
         <configuration>
              <experimentalCoroutines>enable</experimentalCoroutines>
         <configuration/>
    .........
    <plugin/>
.......
<build/>
Kotlin Coroutine Example
Coroutines have been around in programming language for a very long time. Kotlin is the not the first language to it definitely. Kotlin has a very hygienic syntax so it becomes really easy to engage that in the code and to be able to process that. Usually, when you’re writing a method you can mark a method as a suspend that would execute potentially in a different thread but more important asynchronously.
Let’s take a look at how this gonna look like with a little example where we can just kind of entertain the start and see how this would work.
// 1
val sequence = buildSequence {
    println("One")
    yield(1)

    println("Two")
    yield(2)

    println("Three")
    yield(3)
}

// 2
private fun printSequence() = sequence.forEach {
    println(it)
}

// 3
fun main(args: Array<String>) {
    printSequence()
}

// The output of above program

One
1
Two
2
Three
3
The following explains the above code.
- The buildSequence is a wrapper API provided in Kotlin. It’s gonna build a sequence lazily yielding one by one.
- Method for to print the sequence values.
- The main method where we called the printSequence function.
Explaining The Output Of Above Program
You see when you execute this particular sequence of calls notice the output of the sequence how it goes back and forth between the program. So, we entered in the sequence printed the one at the top then the 1 then Two again the number which is 2 and so on and so forth. Notice that when we’re looping through after the first iteration of the sequence we step right at the line number 5 and then execute till line 7. After the buildSequence yield 2, we immediately jumped right into the second iteration of a for-each loop. So this is really where you are jumping into the middle of a function and executing a part of it.
It’s intriguing to think about how in the world this possibly work. In the way this actually works is when you’re leaving off with yield like I mentioned earlier you’re not only returning this result but you’re taking the remaining part of the code and moving it at as with the Continuation.
What Is Continuation
Well, we cannot talk about coroutines without talking about Continuation, so under the hood, it really is a Continuation that plays a very important role. Imagine you make a call to a function but when you returned from the function what if you can return not just the result of the function but a context of where you returned. Now when the caller wants to continue back with you they can call it back into the context and continue further.
Explaining The Continuation Of Above Program Output
Before to start explaining above program output with Continuation I want to show you the bytecode. The following shows the bytecode of the above program.

If you see the highlighted part in the picture you’ve noticed that there’s an extra parameter of Continuation attached with the sequence. The Continuation as a parameter all that is done for you automatically behind the scene. So, think of it as a lambda as two parts of a caller, one is the result of the caller but the other is the lambda. It means caller can use the result and then fire back right into the lambda and then you can continue executing where you left off.
“Continuation plays a really vital role when it comes to using coroutines and you can dissect the code and see how this is working internally.“
Continuation With Suspend Keyword
Let’s try to do something a little different here and see how we can put this is into a bit of practical situation. Now almost in every application, we need to make some network calls and read the result from some API service. Let’s say we have this API call where the user executes a request and read the current time of the server.
Instead of directly using the coroutine with the suspend method I wanna show you the example first with sequential then we gonna see the same example with suspend. Below is a sample code of sequential code.
fun getServerTime(): String {
    return URL("https://server_time.org/")
            .readText()
}

fun main(args: Array<String>) {
    launch { println(getServerTime()) }
}
The getServerTime is very simple method it asks the server to give the current time. To clear things between suspend and sequential I’m gonna show you the first sequential bytecode of the above program.
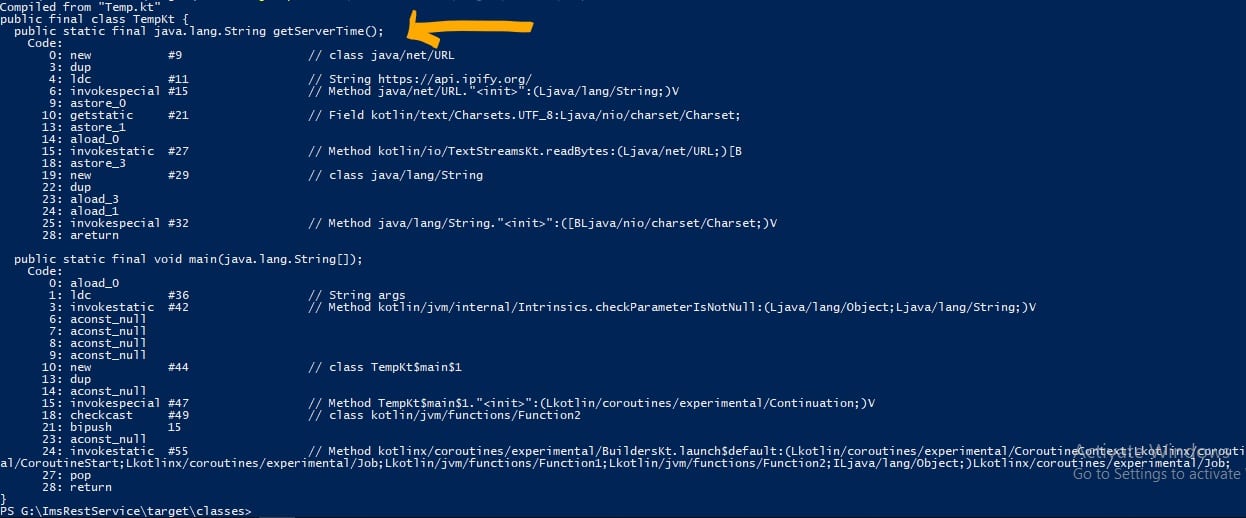 You see with the arrow sign it is a simple method also in bytecode. Now let’s see the same example with a
 suspend keyword. The following shows code with suspend keyword.
suspend fun getServerTime(): String {
    return URL("https://server_time.org/")
            .readText()
}

fun main(args: Array<String>) {
    launch { println(getServerTime()) }
}
Bytecode of the above program.
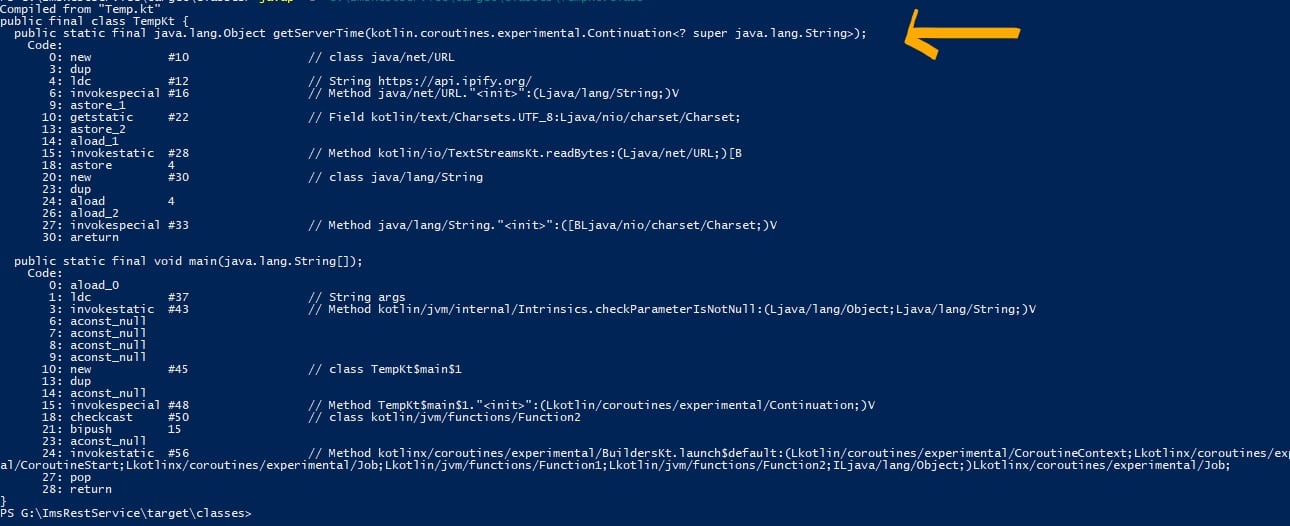 You see in the bytecode of getServerTime function there’s a new parameter added of Continuation. To know this is suspended method it automatically adds a new parameter for you behind the scene. As a result of this when you execute this call you’re going to make rest of the code wrap it into a Kotlin Continuation. So, that is an example of how a call can execute in a thread independent of this and you don’t have wait and block on it.
That is all for now!
Thank you for giving this article a read. I hope this article gives you the good understanding of how Kotlin Coroutine works. If you like it share it with Android Community. Let’s share the knowledge as much as we can.
Thank you for being here and keep reading…


Really helpful material.
Seems to me a literal text translation of kotlin conf video given by Venkat. I have no issues with that but you should give sources and mentions.
I did add the reference at the top If you see…