Android Crop Image Using UCrop Library
Almost in every Android Application, we ask users to add profile picture when signing up and after that, we simply upload the avatar to our backend. But, before uploading that avatar, sometimes, we need to crop the selected image.
So, today I would like to talk about how we can select an image from Gallery or take Picture from the camera and crop that avatar. The application that we’re going to build in this article will work on all versions of Android from Honeycomb (API 11) to Pie (API 28).
For cropping the image we’re going to use UCrop library. UCrop library aims to provide an ultimate and flexible image cropping experience. You can read more about UCrop library in this article.
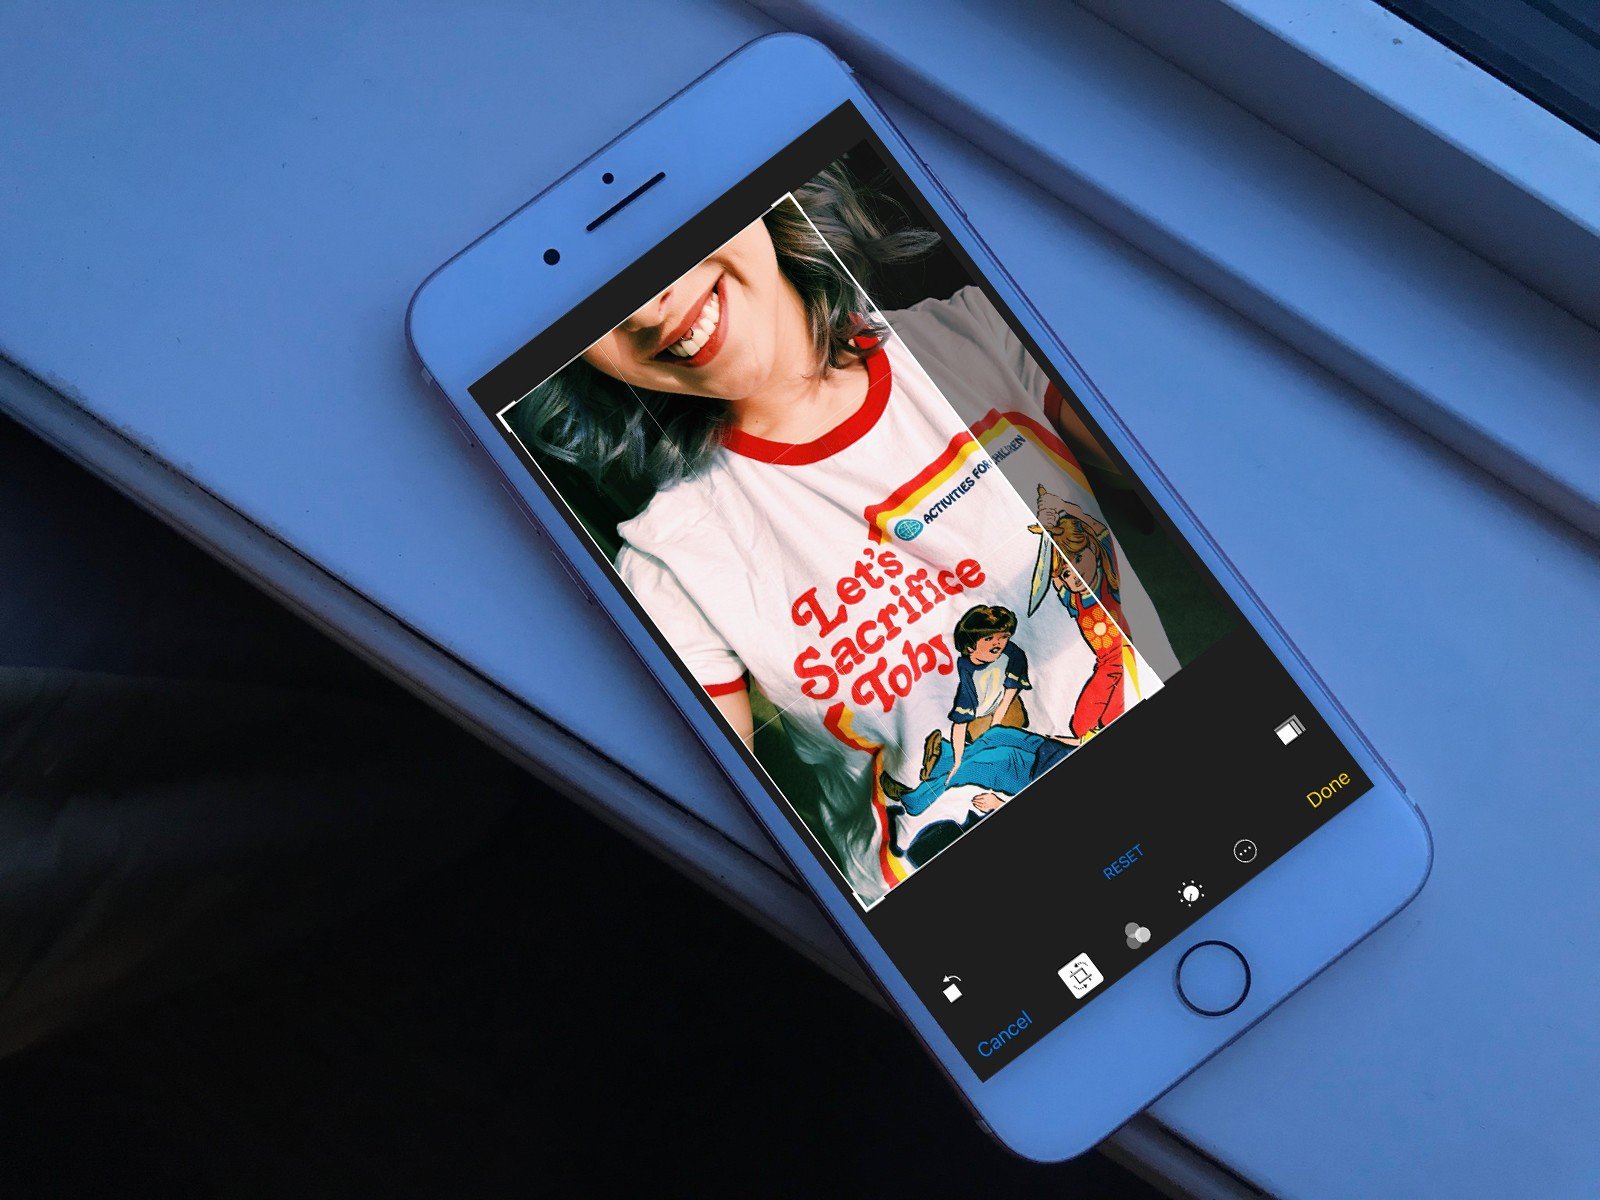
Before start coding, I want to show you guys the demo of our application.
Get Started
In Android Studio go to Create Android Project, press next twice and select Empty Activity, then finish. After the Android Studio gradle builds successfully you’re ready to do the code. You can see MainActivity like below.
public class MainActivity extends AppCompatActivity {

    @Override
    protected void onCreate(Bundle savedInstanceState) {
        super.onCreate(savedInstanceState);
        setContentView(R.layout.activity_main);
    }
}
Include Dependencies
We’re gonna need to add the UCrop dependency in our app-level build.gradle file. Add the below dependency in the build.gradle file.
implementation 'com.github.yalantis:ucrop:2.2.2'
Now add the maven dependency in a top-level build.gradle file.
repositories {
       google()
       jcenter()
       maven { url "https://jitpack.io" }
   }
Once you’ve done these dependencies build your android project and add the following permissions in the Android Manifest file.
<uses-permission android:name="android.permission.CAMERA" />
<uses-permission android:name="android.permission.WRITE_EXTERNAL_STORAGE" />
<uses-permission android:name="android.permission.READ_EXTERNAL_STORAGE" />
You may be curious why the hack I add the Storage permission in order to pick an image from Gallery or take a picture from Camera. Actually, when we select the image from the gallery or take pictures from the camera we need to store an image inside the device memory because of the UCrop library take the Uri instance in order to crop the image. And it would be good because we need to store the cropped image somewhere inside the memory and after that show the image inside the application.
Actually, there’s another thing which we need to discuss before start making our application. As I said at the start of this article, that our application will work on all existing Android devices. So, we need to handle the FileUriExposedException and for that, we need to implement FileProvider in our application. You can read more about FileUriExposedException in this link.
In order to implement FileProvider in your application. First, you need to add a FileProvider <provider/> tag in a AndroidManifest.xml file under the <application/> tag.
<?xml version="1.0" encoding="utf-8"?>
<manifest xmlns:android="http://schemas.android.com/apk/res/android"
    ...
    <application
        ...
        <provider
            android:name="android.support.v4.content.FileProvider"
            android:authorities="${applicationId}.provider"
            android:exported="false"
            android:grantUriPermissions="true">
            <meta-data
                android:name="android.support.FILE_PROVIDER_PATHS"
                android:resource="@xml/provider_paths"/>
        </provider>
    </application>
</manifest>
The ${applicationId} automatically gets the package name of your Android application and concat the .provider with it.
The @xml/provider_paths we need to add it separately in the resource directory. First, you need to create an xml named directory inside the res folder and then create a file named provider_paths inside the previously created directory. Now paste the following code inside the provider_paths file.
<?xml version="1.0" encoding="utf-8"?>
<paths>
    <external-path name="external_files" path="."/>
</paths>
Done! FileProvider is now declared and be ready to use.
1. Open Camera And Take Picture
First of all, we need to query for all the activities in the device which will handle the CAPTURE_REQUEST intent. Now let’s open the camera when the user clicks on openCamera dialog action.
Note: I’m not gonna ask for camera or storage permission in this article but you can get the complete code of the above demo application from the Github.
private void openCamera() {
      Intent pictureIntent = new Intent(MediaStore.ACTION_IMAGE_CAPTURE);
      File file = getImageFile(); // 1
      Uri uri;
      if (Build.VERSION.SDK_INT >= Build.VERSION_CODES.N) // 2
           uri = FileProvider.getUriForFile(activity, BuildConfig.APPLICATION_ID.concat(".provider"), file);
      else
           uri = Uri.fromFile(file); // 3
      pictureIntent.putExtra(MediaStore.EXTRA_OUTPUT, uri); // 4
      startActivityForResult(pictureIntent, CAMERA_ACTION_PICK_REQUEST_CODE);
}
Here what’s going on in the openCamera method.
- Creating an image File with the getImageFile method. This method simply creates a new
Filein the external storage directory. We’ll see the implementation of the method in a couple of minutes. - If the SDK version of the device is API level 23+ then we simply create the
Uriwith the help of FileProvider in order to prevent the FileUriExposedException. The BuildConfig.APPLICATION_ID simply give us the package name of our application and concat the.providerwith it as we did it in theAndroidManifest.xmlfile. - Simply creates the
UrifromFile utility method if the SDK version is less than 24 API level. - Sets the path of where you want to store the selected image so, that we can read the image in the onActivityResult method from the uri path. We’ll see how to do that.
Now let’s create the getImageFile method inside the Activity class.
String currentPhotoPath = "";
private File getImageFile() {
     String imageFileName = "JPEG_" + System.currentTimeMillis() + "_";
     File storageDir = new File(
         Environment.getExternalStoragePublicDirectory(
             Environment.DIRECTORY_DCIM
         ), "Camera"
     );
     File file = File.createTempFile(
         imageFileName, ".jpg", storageDir
     );
     currentPhotoPath = "file:" + file.getAbsolutePath();
     return file;
 }
This method simply creates a random File name with .jpg extension inside the external storage directory. Also, we’re storing the file path inside the currentPhotoPath variable so that we can read the image from specified photo path.
After taking the picture from Camera our image will be stored inside the data extra’s which we pass when creating the Intent for Camera. Now let’s retrieve our image in onActivityResult method and crop it.
Crop the Taken Picture
First, you need to override the onActivityResult method inside your Activity class and add the following code.
@Override
protected void onActivityResult(int requestCode, int resultCode, @Nullable Intent data) {
    if(requestCode == CAMERA_ACTION_PICK_REQUEST_CODE && resultCode == RESULT_OK) {
          Uri uri = Uri.parse(currentPhotoPath);
          openCropActivity(uri, uri);
    }
}
If you observe the code carefully you may have noticed that we’re not using the data.getData() method. It always gives us null because we’re providing a file uri, so load with the currentPhotoPath and call the openCropActivity method.
Note: Our newly taken image will be replaced from the cropped image because I pass the same Uri’s as the sourceUri and destinationUri. You can change this logic by passing a different Uri for a destination.
Add the below openCropActivity method inside your Activity class.
private void openCropActivity(Uri sourceUri, Uri destinationUri) {
        UCrop.of(sourceUri, destinationUri)
        .withMaxResultSize(maxWidth, maxHeight)
        .withAspectRatio(5f, 5f)
        .start(context);
}
The UCrop configuration is created using the builder pattern. The UCrop.of method takes the first parameter as the sourceUri where the image file actually stored and the second parameter as the destinationUri where you want to store the cropped image.
After calling the openCropActivity method the UCrop simply opens up the image cropping activity with the startActivityForResult method and send the cropped image result in the onActivityResult method. Add the updated code inside the onActivityResult method.
@Override
protected void onActivityResult(int requestCode, int resultCode, @Nullable Intent data) {
    if(requestCode == CAMERA_ACTION_PICK_REQUEST_CODE && resultCode == RESULT_OK) {
          Uri uri = Uri.parse(currentPhotoPath);
          openCropActivity(uri, uri);
    } else if (requestCode == UCrop.REQUEST_CROP && resultCode == RESULT_OK) {
          Uri uri = UCrop.getOutput(data);
          showImage(uri);
    }
}
In the updated code we simply get our cropped image Uri and call the showImage method.
Next, add the following method inside your Activity class.
private void showImage(Uri imageUri) {
    File file = FileUtils.getFile(context, imageUri);
    InputStream inputStream = new FileInputStream(file);
    Bitmap bitmap = BitmapFactory.decodeStream(inputStream);
    imageView.setImageBitmap(bitmap);
}
Here we’ve completed our first part of an article where we take the picture from a camera and show the cropped image inside the ImageView.
2. Select Image From Gallery
In order to allow the user to select an image, we need to create an Intent which opens up the Documents app and only shows the images. Now let’s open the Documents app when the user clicks on selectImage dialog action.
Let’s create a new method to open the images.
private void openImagesDocument() {
    Intent pictureIntent = new Intent(Intent.ACTION_GET_CONTENT);
    pictureIntent.setType("image/*");  // 1
    pictureIntent.addCategory(Intent.CATEGORY_OPENABLE);  // 2
    if (Build.VERSION.SDK_INT >= Build.VERSION_CODES.KITKAT) {
         String[] mimeTypes = new String[]{"image/jpeg", "image/png"};  // 3
         pictureIntent.putExtra(Intent.EXTRA_MIME_TYPES, mimeTypes);
    }
    startActivityForResult(Intent.createChooser(pictureIntent,"Select Picture"), PICK_IMAGE_GALLERY_REQUEST_CODE);  // 4
}
The following shows the explanation of the above code.
- By setting the type we specify we only need images no videos or anything else.
- The CATEGORY_OPENABLE used to indicate that
Intentonly wants URI’s that can be opened. You can read more category openable here in this link. - The mimeTypes specify that we are only interested in jpeg or png type images.
- The chooser only shows if there are multiple options available else we simply open up the Documents app.
Crop The Selected Picture
Once you’ve selected the image the onActivityResult method will get hit and we only need to update that method. Add the update method code inside the onActivityResult method.
@Override
protected void onActivityResult(int requestCode, int resultCode, @Nullable Intent data) {
    if(requestCode == CAMERA_ACTION_PICK_REQUEST_CODE && resultCode == RESULT_OK) {
          Uri uri = Uri.parse(currentPhotoPath);
          openCropActivity(uri, uri);
    } else if (requestCode == UCrop.REQUEST_CROP && resultCode == RESULT_OK) {
          Uri uri = UCrop.getOutput(data);
          showImage(uri);
    } else if (requestCode == PICK_IMAGE_GALLERY_REQUEST_CODE && resultCode == RESULT_OK && data != null) {
          Uri sourceUri = data.getData(); // 1
          File file = getImageFile(); // 2
          Uri destinationUri = Uri.fromFile(file);  // 3
          openCropActivity(sourceUri, destinationUri);  // 4
    }
}
The below number points tell you what’s happening inside the updated onActivityResult method.
- Get the selected image
Urifrom data. - Create the image
Filewhere you want to store the cropped image result. - Simply creates the destinationUri fromFile utility method.
- Calls the openCropActivity method. Here we’re passing different Uri’s because our sourceUri is different where our selected image is stored and destinationUri where we want to save our cropped image result.
Now if you run the application you’ll see that all the application functionality will work perfectly. I hope this article will help you to crop the profile picture image. If you’ve any queries regarding this post please do comment below.
You can get the complete source code of above app from GitHub.
Thank you for being here and keep reading…