Error Logging in Asp.Net Core Application | NLog | Log4Net | Tutorials
I find it tough to believe that many developers do not use any Logging library in their applications. For a Web Applications, Error Logging is one of the key attributes to help troubleshoot application bugs. In many cases, developers don’t have direct access to his application after deployment. So, in order to assure the application’s quality, we must be aware of bugs in our application even after deployment.
There are many open-source libraries available for Error Logging. For .Net, most trusted & commonly used frameworks are NLog & Log4Net. Both frameworks make it simpler to send our application logs in different places like databases, files, log management systems & many other places. We can also Email our Critical logs. The awesome thing is that we can send the logs to a different place just by changing the config file.
By using Error Logging in an Application, we can categorize our logs at different levels. Here’s the list.
Levels
- Info – Info Message, enabled in production mode
- Warning – Warning Messages, temporary & recoverable problems.
- Error – Error Messages, programming exceptions.
- Trace – Very detailed Logs, usually enabled during the development phase.
- Debug – Debugging information, less information than Traces.
- Fatal – Serious Errors, failures that need immediate attention.
As I have discussed above, Error Logging Frameworks also facilitates us to send our application’s log to different destinations, we called them targets.
Targets
- Files- We can log our messages into a file.
- Databases – Important Logs can also be stored in a database. Usually, we store only those logs to a database which we need to display in our application.
- Console – In Console Applications, best available target to display logs is console itself.
- Email – In case of fatal errors which need attention we need to aware the team with the failure. so it’s always a good idea to email those logs.
Let’s have a quick look at available Logging frameworks for .Net Core. After deciding the better one, we’ll implement the winner logging framework in our Application. So in case, you missed the Admin Panel tutorials,
here you can follow => Creating Admin Panel in Asp.net Core MVC – Step by Step Tutorial
Choosing a Framework
Here’s the result of a speed comparison of 5 most popular error logging framework for .Net & .Net Core
Logging Frameworks Comparison Result by Loggly and SolarWinds
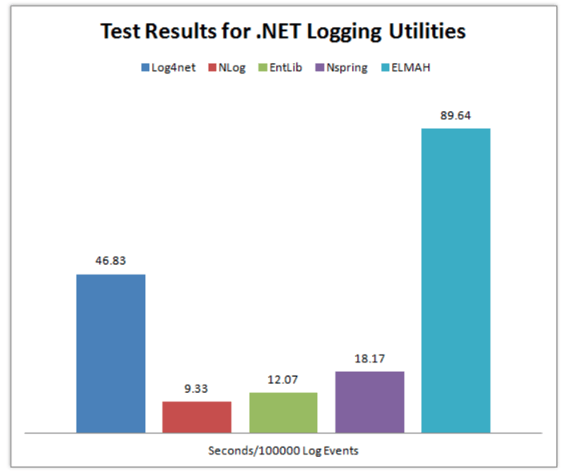
So clearly, NLog is the winner here because it’s taking the minimum time to Log.
Without wasting our time let’s see how we can install, configure and use NLog in our Application.
Creating a Project
I’m going to use VS Code to create an empty web project.
Create an empty Web Application using this command
dotnet new web
after this add the Code below to your “Startup.cs” File to ready your Application.
using Microsoft.AspNetCore.Builder;
using Microsoft.AspNetCore.Hosting;
using Microsoft.Extensions.DependencyInjection;

public class Startup
{
    public void ConfigureServices(IServiceCollection services)
    {
        services.AddMvc();
    }

    public void Configure(IApplicationBuilder app, IHostingEnvironment env)
    {
        if (env.IsDevelopment())
        {
            app.UseDeveloperExceptionPage();
        }

        app.UseMvc(routes =>
        {
            routes.MapRoute(
                name: "default",
                template: "{controller=Home}/{action=Index}/{id?}");
        });
    }
}
Now create a new Folder as “Controllers” at the root level of your Project & inside this folder create a controller class as “HomeController.cs”
Installing NLog
After creating the project, we need to add NLog Library.
NLog is available at Nuget. You can install it in the way you like it. I’m going to use the .Net CLI. So, here’s the command to install NLog
dotnet add package NLog
Configuration
Now Add a configuration file at the root of your project with the name as “NLog.config” & paste this Code
<?xml version="1.0" encoding="utf-8" ?>
<nlog xmlns="http://www.nlog-project.org/schemas/NLog.xsd"
      xmlns:xsi="http://www.w3.org/2001/XMLSchema-instance">

    <targets>
        <target name="logfile" xsi:type="File" fileName="Logs.txt" />
        <target name="logconsole" xsi:type="Console" />
    </targets>

    <rules>
        <logger name="*" minlevel="Info" writeTo="logconsole" />
        <logger name="*" minlevel="Debug" writeTo="logfile" />
    </rules>
</nlog>
There’s another way to configure NLog but I’ll recommend using XML configuration. In this case, you’ll be able to edit you Logging configuration even after publishing your application.
If you still don’t like configuring NLog using above way then you can do the same by programmatically.
Here’s the alternate way.
var config = new NLog.Config.LoggingConfiguration();

var logfile = new NLog.Targets.FileTarget("logfile") { FileName = "Logs.txt" };
var logconsole = new NLog.Targets.ConsoleTarget("logconsole");

config.AddRule(LogLevel.Info, LogLevel.Fatal, logconsole);
config.AddRule(LogLevel.Debug, LogLevel.Fatal, logfile);

NLog.LogManager.Configuration = config;
you can add this code to your “Program.cs” or “Startup.cs”.
Writing Logs
Now Add the code below in your “HomeController.cs” inside your Controllers Folder.
Microsoft.AspNetCore.Mvc;
using NLog;

public class HomeController : Controller
{
    private static Logger logger = LogManager.GetCurrentClassLogger();

    public void Index()
    {
        logger.Debug("Hello from Home Controller...");
    }
}
Run your application & go to the Home Controller URL. e.g. http://localhost:*/Home
Now you’ll find your “Logs.txt” here => bin -> Debug -> netcoreapp
Here’s what I got in my “Logs.txt” File
2019-02-21 13:17:49.4574|DEBUG|NLogTutorials.HomeController|Hello from Home Controller...
Comment If you find any problem or have any Question.
Here are more Articles you might be Interested
– Creating Admin Panel in Asp.net Core MVC – Step by Step Tutorial





i am noob at .net the series article is use useful, thank you very much