Display Data in DataGrid | .NET WPF Grid Layout Tutorial
Windows Presentation Foundation (WPF) is a User Interface Framework provided by Microsoft to develop desktop client applications. It has a variety of controls to work. DataGrid is one of them.
What is DataGrid?
DataGrid is a WPF control which is used to display data in a customizable grid. The “customizable grid” means that we have so many options to display the data depends on our need. Let’s see how we can work with this control.
The article divides into several parts. In this part, we will see how to work with DataGrid and display the data on it.
Open Visual Studio from your PC or Mac and create a new WPF project, name the project to whatever you want. Now we need to make a DataGrid, there are two ways to do that, either we can drag and drop the DataGrid control from the toolbox, or we can write the code for it, let’s go for the second option, but first let’s define our grid layout to have one column and two rows. We will use the first row to put the DataGrid and the second row to place some buttons to perform the actions on the DataGrid. The following lines will create a Grid layout.
<Grid>
    <Grid.ColumnDefinitions>
        <ColumnDefinition SharedSizeGroup="A" Width="*"/>
    </Grid.ColumnDefinitions>
    <Grid.RowDefinitions>
        <RowDefinition Height="*"/>
        <RowDefinition Height="50"/>
    </Grid.RowDefinitions>
</Grid>
Now its time to place our DataGrid layout inside the Grid layout. The following line will create a DataGrid in the first row spanning the entire width of the window. Place the code just before </Grid>.
<DataGrid Name="myGrid" Grid.Column="0" Grid.Row="0" AutoGenerateColumns="False">
</DataGrid>
The AutoGenerateColumns is used to prevent the repetition of the columns. Run the program,
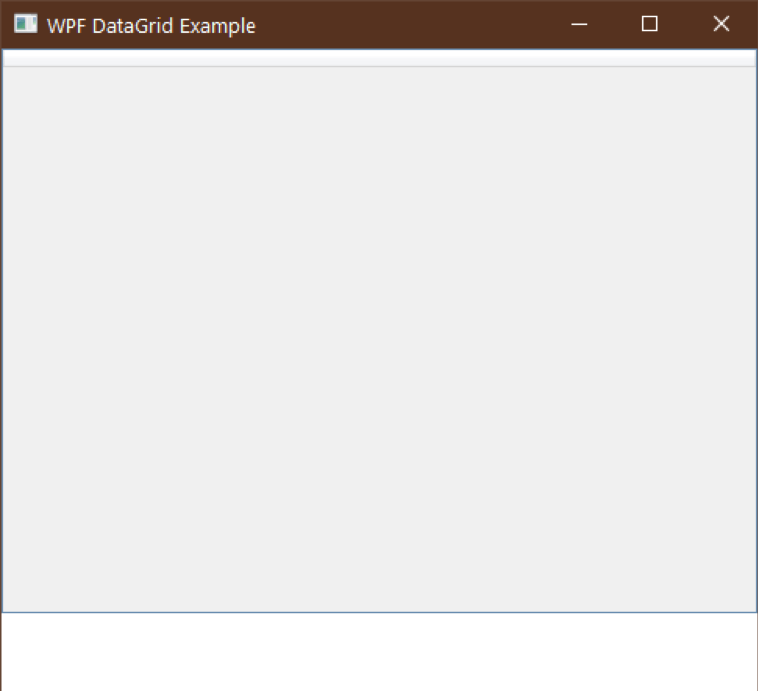
The DataGrid is empty because we haven’t added something to it yet. Now it’s time to add some data to our DataGrid.
We will use the dummy data of Employees to fill our DataGrid. Employees will have an Id, Name, Date of joining, Gender and monthly salary. To save this type of record, we need to have a class.
To create a class, right-click on the project title under solution explorer, go to Add and then select “New Item…”, choose the “class” from available items, name it “Employee” and click ok button.
Copy the following code in the Employee class you just created.
class Employee
{
        public Employee(int id, string name, string dateOfjoining, string gender, double monthlySalary)
        {
                set(id, name, dateOfjoining, gender, monthlySalary);
        }

        public int Id {set; get;}
        public string Name {set; get;}
        public string DateOfJoining {set; get;}
        public string Gender {set; get;}
        public double MonthlySalary {set; get; }

        public void set(int id, string name, string dateOfjoining, string gender, double monthlySalary)
        {
                Id = id;
                Name = name;
                DateOfJoining = dateOfjoining;
                Gender = gender;
                MonthlySalary = monthlySalary;
        }
}
The code above is self-explanatory, but if you are facing trouble to understand it, let me explain it for you. The class have five data members which we will use to store the data. It also has an overloaded constructor and a public method to set or update the values of an object. The set and get keywords after every attribute are used to “assign or get the value” of the data member. The “set” is private, it means we cannot directly assign the data members a value outside the class, and we have to use a method to do so.
Since we’ll have more than one record of Employee, so we need to have a list which will store all the objects of employees. We will be using the list which we are going to create in more than one windows, so we will have to make it available in the entire project.
Before creating the list, let’s first create a new class as we did before and name it “Utility”, make sure that you make it a static class. If you don’t know about “static classes”, the public data members and methods of a static class can be accessed without creating an object of that class first. Since we will use this class without creating an object, so we need to make it a static class.
After creating the “Utility class”, create a data member “ListEmployee” of type “Employee”. We also need to make “ListEmployee” static because C# does not allow us to declare instance data members in a static class. The entire class you just created should be something as follows:
static class Utility
{
     public static List<Employee> ListEmployee;
}
The next step is to initialise the “ListEmployee” before we can use it. To do this, write the following line of code in the No-Argument constructor, under InitializeComponent(); line in the “cs” file of “MainWindow”. The “No-Argument constructor” should look like the following.
public MainWindow()
{
     InitializeComponent();
     Utility.ListEmployee = new List<Employee>();
}
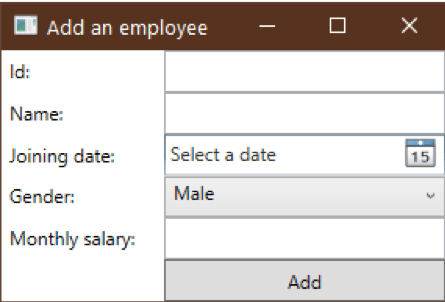
Now, we are moving into an exciting part. We now have to create a new window to take the data of an employee from the user, add it to the list and then display it in the DataGrid. To do this, create a new Window, make four “TextBox” and one DatePicker, don’t forget to create a button which will take the values from these control and add them to the list. You can use the following “XAML” code for your convenience.
<Window x:Class="WPFDataGrid.AddEmployee"
        xmlns="http://schemas.microsoft.com/winfx/2006/xaml/presentation"
        xmlns:x="http://schemas.microsoft.com/winfx/2006/xaml"
        xmlns:d="http://schemas.microsoft.com/expression/blend/2008"
        xmlns:mc="http://schemas.openxmlformats.org/markup-compatibility/2006"
        xmlns:local="clr-namespace:WPFDataGrid"
        mc:Ignorable="d"
        Title="Add an employee" Height="200" Width="300">
    <Grid>
        <Grid.ColumnDefinitions>
            <ColumnDefinition SharedSizeGroup="A" Width="*"/>
            <ColumnDefinition SharedSizeGroup="A" Width="180"/>
        </Grid.ColumnDefinitions>
        <Grid.RowDefinitions>
            <RowDefinition Height="*"/>
            <RowDefinition Height="*"/>
            <RowDefinition Height="*"/>
            <RowDefinition Height="*"/>
            <RowDefinition Height="*"/>
            <RowDefinition Height="*"/>
        </Grid.RowDefinitions>
        <Label Grid.Row="0" Grid.Column="0" Content="Id:"/>
        <TextBox VerticalContentAlignment="Center" Grid.Row="0" Grid.Column="1" Name="txtId"/>
        <Label Grid.Row="1" Grid.Column="0" Content="Name:"/>
        <TextBox VerticalContentAlignment="Center" Grid.Row="1" Grid.Column="1" Name="txtName"/>
        <Label Grid.Row="2" Grid.Column="0" Content="Joining date:"/>
        <DatePicker Grid.Row="2" Grid.Column="1" Name="dtpJoiningDate"/>
        <Label Grid.Row="3" Grid.Column="0" Content="Gender:"/>
        <ComboBox Grid.Row="3" Grid.Column="1" Name="cbxGender">
            <ComboBoxItem IsSelected="True">Male</ComboBoxItem>
            <ComboBoxItem>Female</ComboBoxItem>
        </ComboBox>
        <Label Grid.Row="4" Grid.Column="0" Content="Monthly salary:"/>
        <TextBox Grid.Row="4" Grid.Column="1" Name="txtSalary"/>
        <Button Grid.Row="5" Grid.Column="1" Content="Add" Name="btnAdd" Click="BtnAdd_Click"/>
    </Grid>
</Window>
The XAML above will create a small window just like the following:
The following code is used to get the information from the controls and then add it to our “ListEmployee” object as one item. We have to write this in the click even of Add button.
private void BtnAdd_Click(object sender, RoutedEventArgs e)
{
        //getting the values from controls
        int id = Convert.ToInt32(txtId.Text);
        string name = txtName.Text;
        string date = dtpJoiningDate.SelectedDate.Value.Date.ToShortDateString();
        string gender = ((ComboBoxItem) cbxGender.SelectedItem).Content.ToString();
        double salary = Convert.ToDouble(txtSalary.Text);

        //Creating a new object of Employee
        Employee employee = new Employee(id, name, date, gender, salary);
        //Adding the newly created object to the list
        Utility.ListEmployee.Add(employee);
        //Displaying the message
        MessageBox.Show(this, "The employee has been added.");
        //Calling CLearControls() method to clear the fields
        ClearControls();
}
After adding an employee, we should clear the fields so the user can add multiple employees without closing and opening the window again. Add the following lines of code under the click event of Add button:
private void ClearControls()
{
      txtId.Text = string.Empty;
      txtName.Text = string.Empty;
      dtpJoiningDate.SelectedDate = null;
      cbxGender.SelectedIndex = 0;
      txtSalary.Text = string.Empty;
}
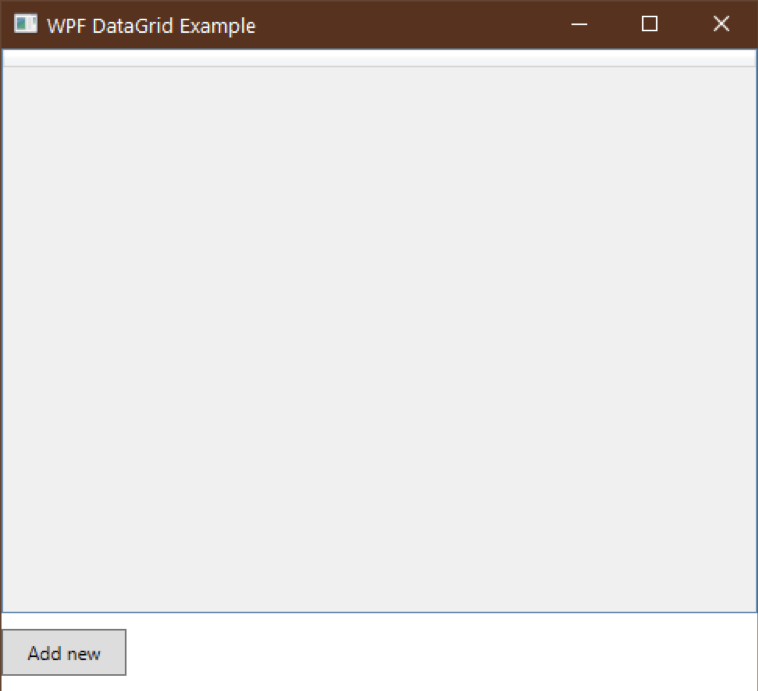
Now, we have to open this window from the MainWindow. For this, first, create a button and then open “Add New Employee” from the click event of the button. The following line of code will add a button in MainWindow under the DataGrid.
Button Grid.Row="1" Grid.Column="0" Content="Add new" Name="AddNew"
         Width="80" Height="30" HorizontalAlignment="Left" Click="AddNew_Click"/>
Now add the following code as the click even of Add new button in the “cs” file of the “MainWindow”.
private void AddNew_Click(object sender, RoutedEventArgs e)
{
        AddEmployee addEmployee = new AddEmployee();
        addEmployee.ShowDialog();
}
After adding the button, our MainWindow will look like the following:
Now try to run the project, click on Add new button of MainWindow to open “add new employee”, fill out the fields and click on the Add button. Close the add new employee window; you will see that the DataGrid will not show any data because we haven’t written any code to display the data to the DataGrid.
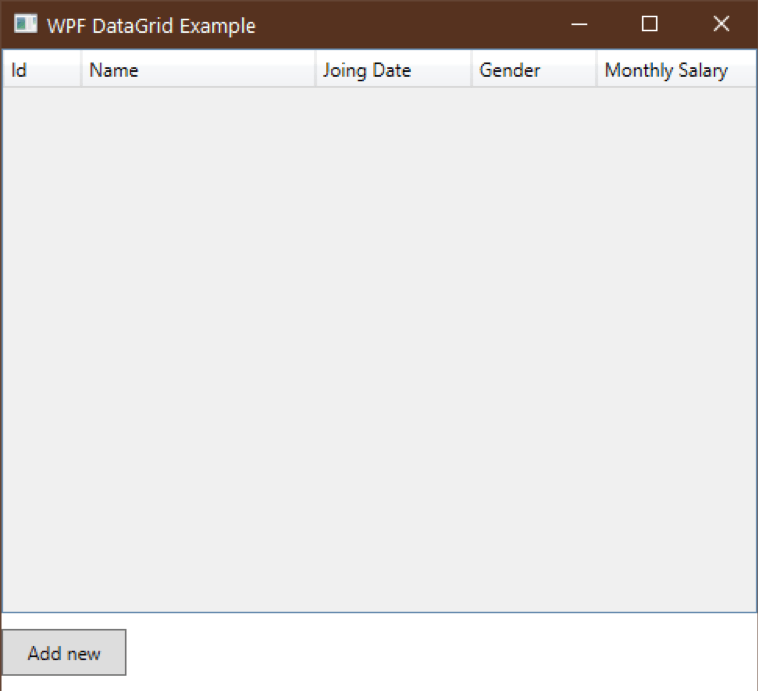
<DataGrid.Columns>
               <DataGridTextColumn Width="50" Header="Id" Binding="{Binding Id}"></DataGridTextColumn>
                <DataGridTextColumn Width="130" Header="Name" Binding="{Binding Name}"></DataGridTextColumn>
                <DataGridTextColumn Width="100" Header="Joing Date" Binding="{Binding DateOfJoining}"></DataGridTextColumn>
                <DataGridTextColumn Width="80" Header="Gender" Binding="{Binding Gender}"></DataGridTextColumn>
                <DataGridTextColumn Width="110" Header="Monthly Salary" Binding="{Binding MonthlySalary}"></DataGridTextColumn>
            </DataGrid.Columns>
In case you haven’t understood the code above, we have to define in <DataGrid.Columns>, and every column is defined in <DataGridTextColumn>. Note that every column has three attributes.
Width: Defines the width of the column.
Header: Defines the name of the column.
Binding: Defines which data member of a list is to use for the value. Now the MainWindow should look like the following:
Now, we have to do one last thing. Add the following method in the “MainWindow.xaml.cs” and call it after addEmployee.ShowDialog(); from click event of Add new button.
private void ShowData()
{
        myGrid.ItemsSource = null;
        myGrid.ItemsSource = Utility.ListEmployee;
}
The ItemsSource property is used to assign a source to the DataGrid. In the first line, we assign it null, because the ItemsSource will only take value when it’s null, so we have to make it null every time we assign it a list.
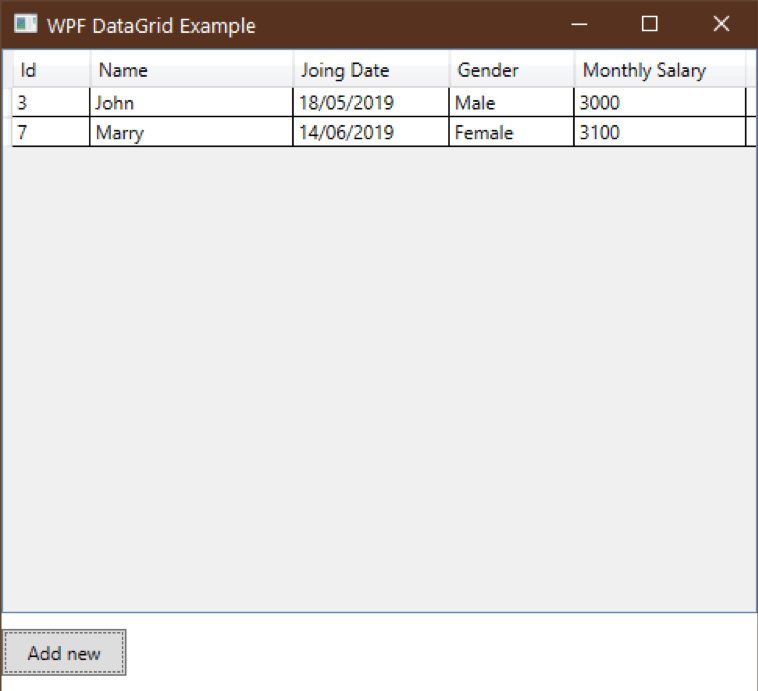
Now run the project, add some employees, and when you close the add new employee window, you will see the data on the DataGrid.
Enough for this post, in the next part of this article, we will see how to change the alignment of headers, add formatting, add alternate row colours, and add right-click context menu to the DataGrid Items.