
Getting Started with Web Application using PHP & MySQL | Tutorials
PHP is a programming language used to create dynamic contents with the database. Basically, PHP is used to develop Web Applications. In this Tutorial, we’re going to Develop a very simple Web Application & we’ll add features in our application in next parts of the tutorial. Here’s the Table of Content for this Tutorial series.
This Tutorial is for beginners. So, for keeping the things simple we’ll not use any PHP Framework. We’ll use Object-Oriented PHP for creating our Web Application.
We’re going to create an Application to manage Doctors, Nurses etc & I’m going to give our application a name “Medibed”.
If you’re interested in creating Web Services using PHP. Here’s my article on Web Services in PHP
Restful Web Services in PHP Example – PHP + MySQL with Source Code
This Tutorial is designed using Object Oriented PHP. So, you must have a basic knowledge of Object Oriented Concepts in PHP before following this series. Here’s a quick overview of all those OOP Concepts.
Now, Let’s start our Tutorial.
Pre-requisites
Before starting this Tutorial, you must have a basic knowledge of PHP, MySQL, HTML, CSS, & JQuery to customize your application. We’ll use MySQL for creating Database for our Application & an Admin Template for creating interactive User Interfaces.
There are many Free Templates Available, for this Tutorial, I’m going to use This Beautiful Admin Template by almasaeed.
Setting up Server
To work on your local system you need to have PHP & MySQL installed on your system. So, the first step is to have a server to run our application. I’m going to install XAMPP because It installs both PHP & MySQL for us.
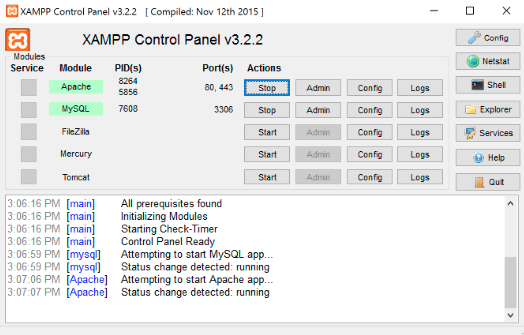
Run your server, go to your “htdocs” Folder inside “XAMPP” Forder & create a new folder there as “medibed”
Creating Database
It’s time to create a database for our Web Application.
I’m going to use very simple Hospital Database with 4 Tables, “doctors”, “nurses”, “patients” & “admins”.
You can use the database of your Web or Mobile App for which you are developing your Application.
Here’s the Database I’m going to use with the name “hospital_db”
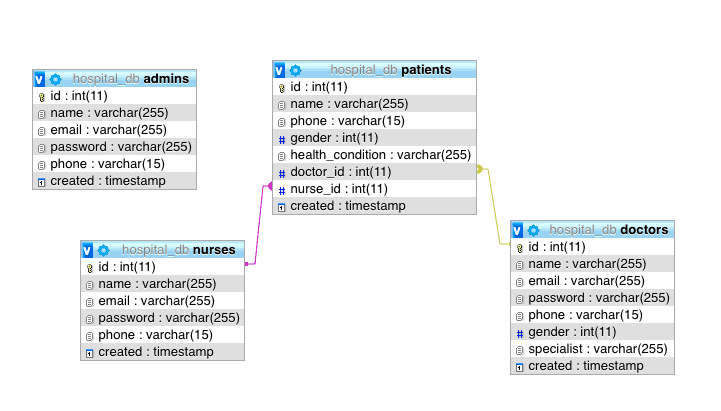
& here’s the SQL script for this database
Database Script
SET SQL_MODE = "NO_AUTO_VALUE_ON_ZERO";
SET AUTOCOMMIT = 0;
START TRANSACTION;
SET time_zone = "+00:00";

-- Database: `hospital_db`
--
-- --------------------------------------------------------
--
-- Table structure for table `admins`
--
CREATE TABLE `admins` (
  `id` int(11) NOT NULL,
  `name` varchar(255) NOT NULL,
  `email` varchar(255) NOT NULL,
  `password` varchar(255) NOT NULL,
  `phone` varchar(15) NOT NULL,
  `created` timestamp NOT NULL DEFAULT CURRENT_TIMESTAMP
) ENGINE=InnoDB DEFAULT CHARSET=latin1;
-- --------------------------------------------------------
--
-- Table structure for table `doctors`
--
CREATE TABLE `doctors` (
  `id` int(11) NOT NULL,
  `name` varchar(255) NOT NULL,
  `email` varchar(255) NOT NULL,
  `password` varchar(255) NOT NULL,
  `phone` varchar(15) NOT NULL,
  `gender` int(11) NOT NULL,
  `specialist` varchar(255) NOT NULL,
  `created` timestamp NOT NULL DEFAULT CURRENT_TIMESTAMP
) ENGINE=InnoDB DEFAULT CHARSET=latin1;
--
-- Dumping data for table `doctors`
--
INSERT INTO `doctors` (`id`, `name`, `email`, `password`, `phone`, `gender`, `specialist`, `created`) VALUES
(1, 'Ahsan Saeed', '[email protected]', 'Vm0xMFlWbFdWWGhVYmxKWFltdHdVRlpzV21GWFJscHlWV3RLVUZWVU1Eaz0=', '03218878961', 0, 'Heart', '2018-05-01 13:07:24');
-- --------------------------------------------------------
--
-- Table structure for table `nurses`
--
CREATE TABLE `nurses` (
  `id` int(11) NOT NULL,
  `name` varchar(255) NOT NULL,
  `email` varchar(255) NOT NULL,
  `password` varchar(255) NOT NULL,
  `phone` varchar(15) NOT NULL,
  `created` timestamp NOT NULL DEFAULT CURRENT_TIMESTAMP
) ENGINE=InnoDB DEFAULT CHARSET=latin1;
--
-- Dumping data for table `nurses`
--
INSERT INTO `nurses` (`id`, `name`, `email`, `password`, `phone`, `created`) VALUES
(1, 'Ahsan', '[email protected]', 'MTIzNDU=', '03218878961', '2018-06-27 13:39:31'),
(2, '2', 'ABC', 'WFla', '123456789', '2018-07-06 13:50:24'),
(3, 'Shehryar khan', '[email protected]', 'YXBwcnl4', '3433243243', '2018-07-06 18:12:35');
-- --------------------------------------------------------
--
-- Table structure for table `patients`
--
CREATE TABLE `patients` (
  `id` int(11) NOT NULL,
  `name` varchar(255) NOT NULL,
  `phone` varchar(15) NOT NULL,
  `gender` int(11) NOT NULL,
  `health_condition` varchar(255) NOT NULL,
  `doctor_id` int(11) NOT NULL,
  `nurse_id` int(11) NOT NULL,
  `created` timestamp NOT NULL DEFAULT CURRENT_TIMESTAMP
) ENGINE=InnoDB DEFAULT CHARSET=latin1;
--
-- Dumping data for table `patients`
--
INSERT INTO `patients` (`id`, `name`, `phone`, `gender`, `health_condition`, `doctor_id`, `nurse_id`, `created`) VALUES
(6, 'hjj', '9988596666', 1, 'vbjbb', 1, 1, '2018-06-26 13:12:18'),
(9, '2', '123456789', 1, 'OK', 1, 1, '2018-07-06 13:59:25'),
(10, '2', '123456789', 1, 'OK', 1, 1, '2018-07-06 14:13:13'),
(11, 'shehryar', '123456789', 1, 'OK', 1, 1, '2018-07-06 17:36:08'),
(14, 'Coding Infinite', '3433243243', 0, 'asd', 1, 1, '2018-07-06 18:39:42'),
(15, 'Coding Infinite', '3433243243', 0, 'asd', 1, 1, '2018-07-06 18:40:07'),
(16, 'Coding Infinite', '3433243243', 0, 'asd', 1, 1, '2018-07-06 18:40:59');
--
-- Indexes for dumped tables
--
--
-- Indexes for table `admins`
--
ALTER TABLE `admins`
  ADD PRIMARY KEY (`id`);
--
-- Indexes for table `doctors`
--
ALTER TABLE `doctors`
  ADD PRIMARY KEY (`id`);
--
-- Indexes for table `nurses`
--
ALTER TABLE `nurses`
  ADD PRIMARY KEY (`id`);
--
-- Indexes for table `patients`
--
ALTER TABLE `patients`
  ADD PRIMARY KEY (`id`),
  ADD KEY `doctor_id` (`doctor_id`),
  ADD KEY `nurse_id` (`nurse_id`);
--
-- AUTO_INCREMENT for dumped tables
--
--
-- AUTO_INCREMENT for table `admins`
--
ALTER TABLE `admins`
  MODIFY `id` int(11) NOT NULL AUTO_INCREMENT;
--
-- AUTO_INCREMENT for table `doctors`
--
ALTER TABLE `doctors`
  MODIFY `id` int(11) NOT NULL AUTO_INCREMENT, AUTO_INCREMENT=2;
--
-- AUTO_INCREMENT for table `nurses`
--
ALTER TABLE `nurses`
  MODIFY `id` int(11) NOT NULL AUTO_INCREMENT, AUTO_INCREMENT=4;
--
-- AUTO_INCREMENT for table `patients`
--
ALTER TABLE `patients`
  MODIFY `id` int(11) NOT NULL AUTO_INCREMENT, AUTO_INCREMENT=17;
--
-- Constraints for dumped tables
--
--
-- Constraints for table `patients`
--
ALTER TABLE `patients`
  ADD CONSTRAINT `patients_ibfk_1` FOREIGN KEY (`doctor_id`) REFERENCES `doctors` (`id`),
  ADD CONSTRAINT `patients_ibfk_2` FOREIGN KEY (`nurse_id`) REFERENCES `nurses` (`id`);
COMMIT;
Save the Above SQL Script in a file as “hospital_db.sql”.
Go to http://localhost/phpmyadmin, create a database as “hospital_db” & import the SQL File in your Database.
Now our database is ready & the next step is to set up our Server & AdminLTE Template for our Application.
Setting Up Template
First, you need to download AdminLTE Template. So download or clone AdminLTE & Unzip AdminLTE folder.
You’ll see these files & folders.
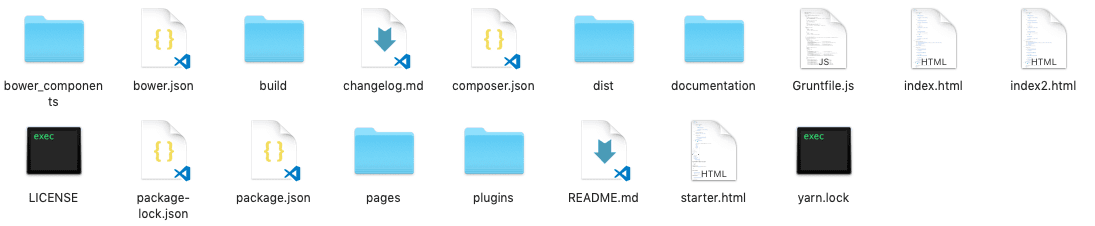
For keeping our project clean you need to copy & paste only Two Folders “bower_components” & “dist” from here to the folder we have created earlier with the name “medibed”.
Let start by creating a Layout Page for our Application.
Now create a new file as “master.php” at the root folder of your Folder & paste this code.
<!DOCTYPE html>
<html>
<head>
  <meta charset="utf-8">
  <meta http-equiv="X-UA-Compatible" content="IE=edge">
  <title>MediBed</title>
  <!-- Tell the browser to be responsive to screen width -->
  <meta content="width=device-width, initial-scale=1, maximum-scale=1, user-scalable=no" name="viewport">
  <link rel="stylesheet" href="../bower_components/bootstrap/dist/css/bootstrap.min.css">
  <!-- Font Awesome -->
  <link rel="stylesheet" href="../bower_components/font-awesome/css/font-awesome.min.css">
  <!-- Ionicons -->
  <link rel="stylesheet" href="../bower_components/Ionicons/css/ionicons.min.css">
  <!-- Theme style -->
  <link rel="stylesheet" href="../dist/css/AdminLTE.min.css">
  <link rel="stylesheet" href="../dist/css/skins/skin-blue.min.css">

  <!-- Google Font -->
  <link rel="stylesheet"
        href="https://fonts.googleapis.com/css?family=Source+Sans+Pro:300,400,600,700,300italic,400italic,600italic">
</head>
<body class="hold-transition skin-blue sidebar-mini">
<div class="wrapper">

  <!-- Main Header -->
  <header class="main-header">

    <!-- Logo -->
    <a href="index.php" class="logo">
      <!-- mini logo for sidebar mini 50x50 pixels -->
      <span class="logo-mini"><b>M</b>BD</span>
      <!-- logo for regular state and mobile devices -->
      <span class="logo-lg"><b>Medi</b>BED</span>
    </a>

    <!-- Header Navbar -->
    <nav class="navbar navbar-static-top" role="navigation">
      <!-- Sidebar toggle button-->
      <a href="#" class="sidebar-toggle" data-toggle="push-menu" role="button">
        <span class="sr-only">Toggle navigation</span>
      </a>
      <!-- Navbar Right Menu -->
      <div class="navbar-custom-menu">
        <ul class="nav navbar-nav">


          <!-- User Account Menu -->
          <li class="dropdown user user-menu">
            <!-- Menu Toggle Button -->
            <a href="" class="dropdown-toggle" data-toggle="dropdown">
              <!-- The user image in the navbar-->
              <img src="../dist/img/avatar5.png" class="user-image" alt="User Image">
              <!-- hidden-xs hides the username on small devices so only the image appears. -->
              <span class="hidden-xs">Ahmed Khalid</span>
            </a>
            <ul class="dropdown-menu">
              <!-- The user image in the menu -->
              <li class="user-header">
                <img src="../dist/img/avatar5.png" class="img-circle" alt="User Image">

                <p>
                  Ahmed Khalid - Developer
                  <small>Member since May. 2018</small>
                </p>
              </li>

              <!-- Menu Footer-->
              <li class="user-footer">
                <div class="pull-left">
                  <a href="#" class="btn btn-default btn-flat">Profile</a>
                </div>
                <div class="pull-right">
                  <a href="#" class="btn btn-default btn-flat">Sign out</a>
                </div>
              </li>
            </ul>
          </li>
          <!-- Control Sidebar Toggle Button -->

        </ul>
      </div>
    </nav>
  </header>
  <!-- Left side column. contains the logo and sidebar -->
  <aside class="main-sidebar">

    <!-- sidebar: style can be found in sidebar.less -->
    <section class="sidebar">

      <!-- Sidebar user panel (optional) -->
      <div class="user-panel">
        <div class="pull-left image">
          <img src="../dist/img/avatar5.png" class="img-circle" alt="User Image">
        </div>
        <div class="pull-left info">
          <p>Ahmed Khalid</p>
          <!-- Status -->
          <a href=""><i class="fa fa-circle text-success"></i> Online</a>
        </div>
      </div>

      <!-- search form (Optional) -->
      <form action="#" method="get" class="sidebar-form">
        <div class="input-group">
          <input type="text" name="q" class="form-control" placeholder="Search...">
          <span class="input-group-btn">
              <button type="submit" name="search" id="search-btn" class="btn btn-flat"><i class="fa fa-search"></i>
              </button>
            </span>
        </div>
      </form>
      <!-- /.search form -->

      <!-- Sidebar Menu -->
      <ul class="sidebar-menu" data-widget="tree">
        <li class="header">Menu</li>
        <!-- Optionally, you can add icons to the links -->
        <li class="treeview">
          <a href="#"><i class="fa fa-medkit"></i> <span>Doctors</span>
            <span class="pull-right-container">
                <i class="fa fa-angle-left pull-right"></i>
              </span>
          </a>
          <ul class="treeview-menu">
            <li><a href="/medibed/doctor/create.php">Create Doctor</a></li>
            <li><a href="/medibed/doctor">All Doctors</a></li>
          </ul>
        </li>
      </ul>

      <!-- /.sidebar-menu -->
    </section>
    <!-- /.sidebar -->
  </aside>

  <!-- Content Wrapper. Contains page content -->
  <div class="content-wrapper">
    <!-- Content Header (Page header) -->
    <section class="content-header">
      <h1>
        Dashboard
        <small>Welcome to Admin Dashboard</small>
      </h1>
      <ol class="breadcrumb">
        <li><a href="#"><i class="fa fa-dashboard"></i> MediBed</a></li>
        <li class="active">Dashboard</li>
      </ol>
    </section>

    <!-- Main content -->
    <section class="content container-fluid">

      <?php echo $content; ?>

    </section>
    <!-- /.content -->
  </div>
  <!-- /.content-wrapper -->

  <!-- Main Footer -->
  <footer class="main-footer">
    <!-- Default to the left -->
    <strong>Copyright © 2018 <a href="https://codinginfinite.com">Coding Infinite</a>.</strong> All rights reserved.
  </footer>

  <!-- Add the sidebar's background. This div must be placed
  immediately after the control sidebar -->
  <div class="control-sidebar-bg"></div>
</div>
<!-- ./wrapper -->

<!-- REQUIRED JS SCRIPTS -->

<!-- jQuery 3 -->
<script src="../bower_components/jquery/dist/jquery.min.js"></script>
<!-- Bootstrap 3.3.7 -->
<script src="../bower_components/bootstrap/dist/js/bootstrap.min.js"></script>
<!-- DataTables -->
<script src="../bower_components/datatables.net/js/jquery.dataTables.min.js"></script>
<script src="../bower_components/datatables.net-bs/js/dataTables.bootstrap.min.js"></script>
<!-- AdminLTE App -->
<script src="../dist/js/adminlte.min.js"></script>

</body>
</html>
This is our master/layout page. We’ll load the content of all other pages inside this master page.
Let’s test our master page.
Create a new Folder as “Doctor” at the root of our project & inside this folder create a new file with the name “index.php”
Now, your “medibed” folder should look like this.
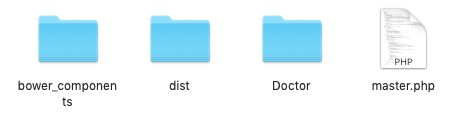
Add the Code below Inside your “index.php”
<?php
  $content = '<h2>Your Main Content Here</h2>';
  include('../master.php');
?>
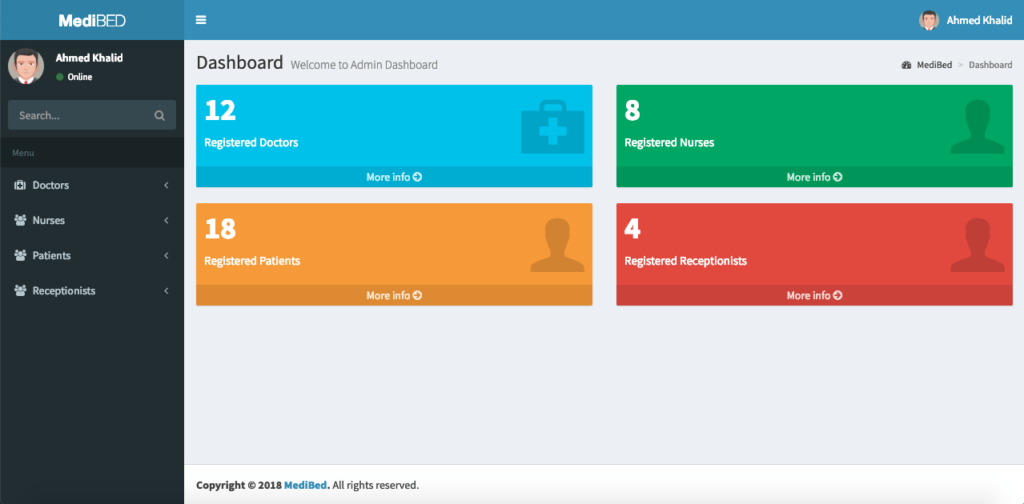
Now, open your browser & go to this URL => http://localhost/medibed/doctor
you’ll see this

Congrats, you have successfully completed the first step toward creating your Web Application.
In the Next part of this Tutorial, we’ll perform CRUD operations using this beautiful Template.
Comment If you have any question or find any difficulty. I’m here to solve your problem.
You might be interested in:


Hello bro I need Help
Sure. Please let me know, how can I help you?
I have same problem of others had. Please share the modified code if any.
Here’s the link of fixed Code. https://github.com/shehryarkn/PHP-MySQL-CRUD-Web-Application/blob/master/hospital_db.sql
I am having the same issue as Cedric. The names of the doctors are not displaying. Was there a simple solution?
Thank you, this tutorial is very helpful if I can get it working.
Thank you for your kindness.
Hi! I’m having trouble with this whole tutorial. I’m not familiar with XAMPP and we have a project that is exactly what we need to do here. I did everything as told but I can’t seem to figure out why there’s no values being shown in All Doctors page and I can’t create a new one. I think my database isn’t connected to the site. Anything I could’ve missed?
Please email your project at [email protected].
I’ll try to find the bugs in your Code & let you know.