Web Login Page Tutorial using Django Authentication System | Python
In a medium or large web application, it is very common and required to have a user authentication system to deal with users management and offer resources based on identity. Web Developers can implement authentication system by their own but here two points must be considered, first, implementing a secure authentication system is challenging and a flaw can lead to huge damage; second, the authentication system remains very similar in its implementation, hence following DRY principle (Don’t Repeat Yourself) it is not wise to reinvent the wheel. So, most of the web framework offers a module for authentication i.e. expert developers of framework implement the authentication system once and further any developer can use the module to implement and customized authentication in their web application.
In this article, we are going to provide a hands-on guide to implement authentication in Django based web application using Django’s inbuilt authentication system. If you are reading this article it means you are familiar with Django web framework and know the basic development with Django, so we will directly dive into building a web application to demonstrate the use of Django inbuilt authentication app/module. As we are aware that Django functionalities are implemented using the app and so authentication is also available as an app in the default installation of Django (we will discuss this later in details.).
So, what web application we are going to build? For demo purpose, our use case is like this,
“Suppose you are a web developer and want to create a web application which greets registered user with a welcome message once they provide correct username & password. After login user can logout from the system. Without login, any visitor will only get instruction that s/he is not login.”
Note: Again, for demo purpose, the application will not have a user registration system instead we will Django inbuilt function to create users for the application.
Now, we are clear with the idea of web application we are going to build, let get started. So, the major steps can be listed as below:
- Create a new project (Web application)
- Add a new app to project (a module)
- Add authentication to your application
1. Create a new web application
To develop the login-based web application, we must create a project folder first which will all the codes and other related files. In this demo application, I am using conda virtual environment from Anaconda. So, let get started, Open the terminal and run below commands.
a.) Project folder
1. create a project folder
$mkdir DjangoLogin
2. Move to project folder
$cd DjangoLogin
b.) Create a virtual environment using Conda
$conda create -n LoginProject python=3.6
//conda is a command, available if you have installed Anaconda distribution of Python.
c.) Activate the virtual environment and work within it.
$source activate LoginProject
d.) Django Installation
(LoginProject)$ pip install django
// Notice the terminal prompt will have virtual environment name as a prefix
Once you have successfully, install Django in your virtual environment you will get the message as below:
#Successfully installed django-2.2.3 pytz-2019.1 sqlparse-0.3.0
e.) Create a django project
(LoginProject)$ django-admin startproject myloginproject
f.) Run the server and test the installation
(LoginProject)$ cd myloginproject
(LoginProject)$ python manage.py runserver
// This will result in running the server and if you visit the http://127.0.0.1:8000/ in your browser you will see the default django page as below.
2. Create a home page of the project
Once you got running the Django, it is time to change the home page to our own home page. For this purpose, here we are going to create an app (the app is Django way to organize web application, there can be many apps in a Django project) myhome. This app will have all the required files for our web application.
a.) Create app within Django project
(LoginProject)/myloginproject$ python manage.py startapp myhome
After creating the app, we have to add this to installed_apps sections of settings.py.
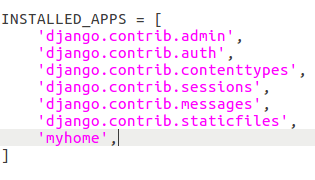
In this web application, I am going to use a template to show the contents to the user. Django offers two ways to use the template with the project, first via app-specific templates folder which holds all the templates files and second project-specific global templates folder. In this project, I am going to use the project specific templates scheme. So, for that, we have to create a templates folder within the project template.

b.) Creating templates
(LoginProject)/myloginproject$ mkdir templates
(LoginProject)$/myloginproject/templates$ touch home.html
Note: It is required to make changes in settings.py to enforce global /project-specific templates by adding the path in DIRS as below. Open the settings.py file and add below lines.
'DIRS': [os.path.join(BASE_DIR, 'templates')],

Once you have done with templates settings, let add something to home.html and create a view for the same.
c.) Create template (home.html)
Open home.html and add below code.
<p>
  Welcome to Coding Infinite Homepage.
</p>
d.) Create a view for the app (myhome/views.py)
from django.views.generic import TemplateView

class HomePageView(TemplateView):
    template_name = 'home.html'
Once our view and template are ready it is time to give route to them i.e. adding them to Django routing scheme via urls.py file. Again, the Django project can have project-specific route file or app-specific, it is good practice to have app-specific routes and then add them to the project route file, which keeps things clean and easy to follow. By default, the app doesn’t have the urls.py file so let create that as follow:
e.) Create urls.py and add the route
(LoginProject)$/myloginproject/myhome$ touch urls.py
Add below code to urls.py, which will add our template home to the root path.
from django.urls import path

from .views import HomePageView

urlpatterns = [
    path('', HomePageView.as_view(), name='home'),
]
f.) Add app routes to project route (myloginproject/urls.py)
add below line to the urls.py
path('', include('myhome.urls')),
"""myloginproject2 URL Configuration

The `urlpatterns` list routes URLs to views. For more information please see:
    https://docs.djangoproject.com/en/2.2/topics/http/urls/
Examples:
Function views
    1. Add an import:  from my_app import views
    2. Add a URL to urlpatterns:  path('', views.home, name='home')
Class-based views
    1. Add an import:  from other_app.views import Home
    2. Add a URL to urlpatterns:  path('', Home.as_view(), name='home')
Including another URLconf
    1. Import the include() function: from django.urls import include, path
    2. Add a URL to urlpatterns:  path('blog/', include('blog.urls'))
"""
from django.contrib import admin
from django.urls import path,include


urlpatterns = [
    path('admin/', admin.site.urls),
    path('', include('myhome.urls')),
]
With this, we are good to go and we have added an app to our project successfully. Run the server and visit the http://127.0.0.1:8000/ in your browser you will see the content of your home.html template file.

3. Add Authentication to the app
Once you have successfully running app, it is time to add authentication to your app. You would have observed that anyone than visit the URL and can view the content but we want the only visitor with login credentials can see the contents after properly login to the system. So, let build login and logout to our existing app.
Building login and logout is a complex process and there are chances of mistakes, so Django comes with authentication app (as explained earlier, Django project are organized through app and app can be used to extend the functionalities.). So, there is an authentication app by default to every Django project (django.contrib.auth).
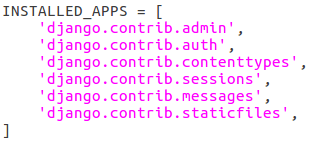
So, this auth app have almost everything we need to implement authentication to our application, we just have to attach authentication to our existing app by following below steps:
a.) Creating login page
We have to create a login template to have the login form. Django follows some default naming convention like, it will look for a login.html in registration folder with templates folder. So, let create the folder and template file.
(LoginProject)$/myloginproject/templates$ mkdir registration
(LoginProject)$/myloginproject/templates$ cd registration
(LoginProject)$/myloginproject/templates/registration$ touch login.html
b.) Template extension
Django offers ways to reuse an already existing template to extend the new template file. So, for our demo application, we will have a base.html which will be extended by all other templates.
(LoginProject)$/myloginproject/templates$ touch base.html
c.) Add content to templates/base.html, templates/home.html and registration/login.html
<!DOCTYPE html>
<html>
<head>
  <meta charset="utf-8">
  <title>{% block title %}Coding Infinite: Tutorial for Web Login using Django{% endblock %}</title>
</head>
<body>
  <main>
    {% block content %}
    {% endblock %}
  </main>
</body>
</html>
{% extends 'base.html' %}

{% block title %}Login{% endblock %}

{% block content %}
<div style="text-align:center"><h2>Login</h2></div>


<div style="text-align:center">

  <form method="post" id="form_login">
    {% csrf_token %}
    {{ form.as_p }}
    <button type="submit">Login</button>
  </form></div>
{% endblock %}
{% extends 'base.html' %}

{% block title %}Home{% endblock %}

{% block content %}
{% if user.is_authenticated %}
  <div style="text-align:center">Hi {{ user.username }}! Welocme to Coding Infinite!!</div>
  <p><a href="{% url 'logout' %}">logout</a></p>
{% else %}
  <p>You are not logged in</p>
  <a href="{% url 'login' %}">login</a>
{% endif %}
{% endblock %}
The code in both files are self-explained, much of them are HTML and basic Django. In the login.html, following lines are important.
{% csrf_token %} —- This is for security and prevent cross-site forgery attack.
{{ form.as_p }} —- This is the default form class from django and auth app render as per login requirements.
We have changed a lot in home.html, to add login and a logout link. The login link will call login template and logout will end the session.
d.) Add auth app to project route (urls.py)
Auth app is default in Django but the path is not included in the route so we have to add auth path to project’s urls.py.
path('accounts/', include('django.contrib.auth.urls')),

With this, we have added authentication to our system. Let’s run and check the output.
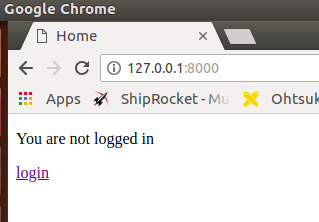

Clicking on login will bring you the login form but do you have created a user? No, giving any login credential will result in an error such as “no such table: auth_user”. So, what is this error, many app needs database table to work and Django has the table created by default but we need to activate those table and we can do that will migrate command with manange.py.
e.) Creating default database tables
(LoginProject)$/myloginproject$ python manange.py migrate
After successful migration, again run the server and test the application. This time you will not get the previous error but wrong credentials message (“Please enter a correct username and password. Note that both fields may be case-sensitive.”) will be shown for any login credentials. Why so?
Because we have not created any user for our authentication system. This can be done via a registration link but for demo purpose, we will use the default user creation process comes with Django.
f.) Create user
(LoginProject)$/myloginproject$ python manage.py createsuperuser
This will prompt the user to give username, email, password and after successfully giving all details a user will be created and we can login with the same credentials. Now, can run the test server and test the page. This will again give an error, page not found (404) as below:
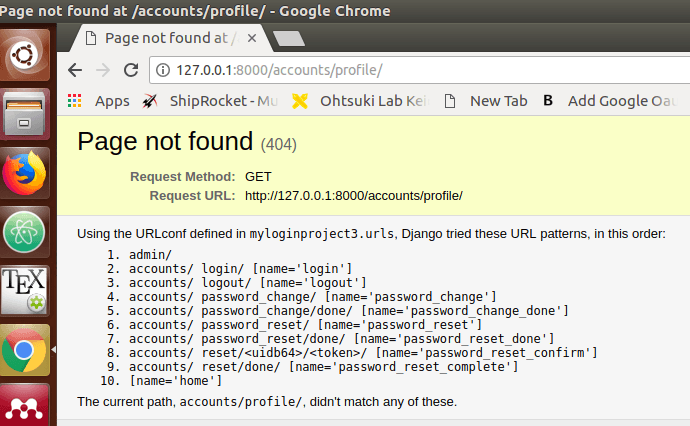
So, what is this error? This is an error because we have not specified the landing page after login which should be our home template. So, we have to specify landing page for login and logout.
g.) Adding landing page
Add below two lines at the bottom of settings.py of project.
LOGIN_REDIRECT_URL = 'home'
LOGOUT_REDIRECT_URL = 'home'
Now, with this is our web login demo is ready and will work smoothly. Go and test your application.
Below is the video for showing the working of the demo application.
Note: For writing this article, I took help from this tutorial and thanks for the same.
Here’re some more Articles, you might be interested:
— Top 5 Python Web Frameworks to Learn



what about the signup page?
Not working. it’s showing an error Method Not Allowed (POST): /
I get a HTTP 405 error when I press on my login button on the homepage, everything else I believe works