Send Email using JavaScript – Complete App with Source Code
Sending an email through your web app is some times a hectic process for beginners. In this article, I will walk you through a simple JavaScript task assignment app. The user can add the assignee name, email and task description and can simply send email to the assignee with task details using a library called email.js. I will also explain how you can persist the task using local storage.
Prerequisites
In order to follow the article, you should be familiar with HTML, Bootstrap and JavaScript. You can use any code editor to follow along.
Learning outcomes
- JavaScript DOM Traversal
- Using JavaScript Library
- Local Storage
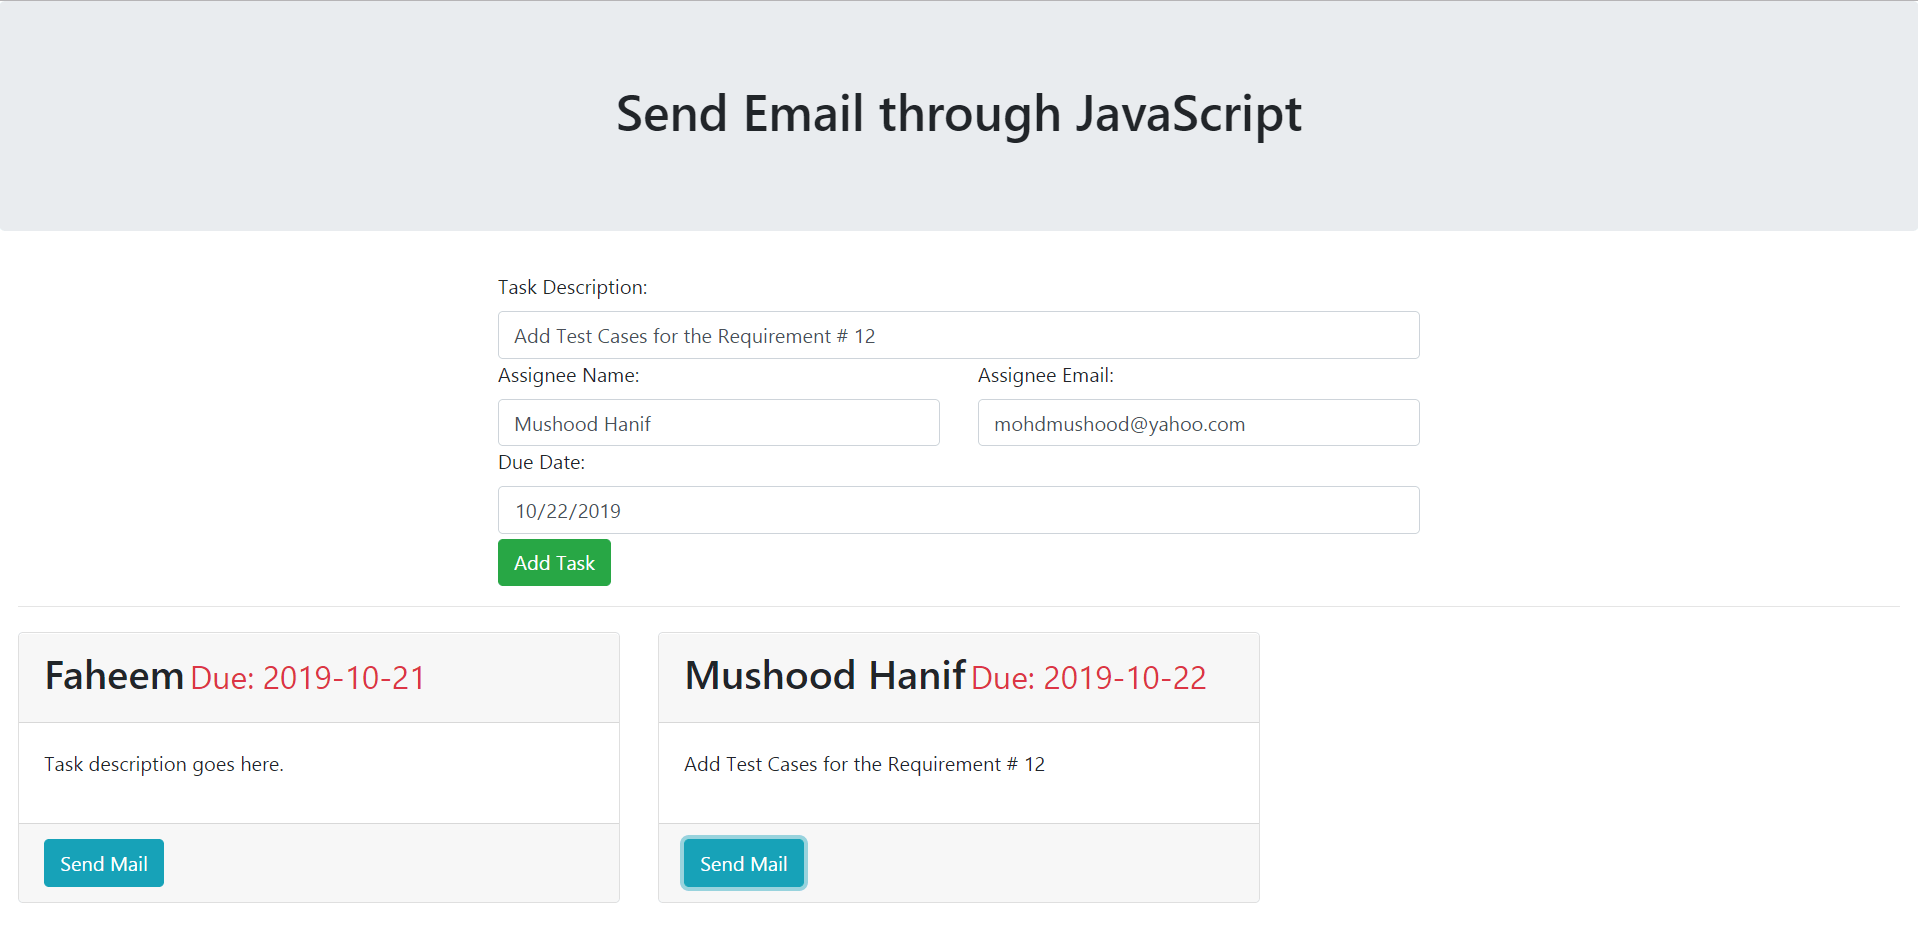
Final Look of the app

Bootstrap 4 cdn
I will be using Bootstrap 4’s CDN for the app. You can either use it or may use some other way to add it to your app.
 <!-- Add this in <head> element-->
<link rel="stylesheet" href="https://maxcdn.bootstrapcdn.com/bootstrap/4.3.1/css/bootstrap.min.css">
<script src="https://ajax.googleapis.com/ajax/libs/jquery/3.4.1/jquery.min.js"></script>

<!-- Add this before closing body tag -->
<script src="https://cdnjs.cloudflare.com/ajax/libs/popper.js/1.14.7/umd/popper.min.js"></script>
<script src="https://maxcdn.bootstrapcdn.com/bootstrap/4.3.1/js/bootstrap.min.js"></script>
Developing app’s front-end
Create a file named index.html and add the following piece of code.
<!DOCTYPE html>
<html lang="en">
<head>
    <!-- Required meta tags always come first -->
    <meta charset="utf-8">
    <meta name="viewport" content="width=device-width, initial-scale=1, shrink-to-fit=no">
    <meta http-equiv="x-ua-compatible" content="ie=edge">
    <link rel="stylesheet" href="https://maxcdn.bootstrapcdn.com/bootstrap/4.3.1/css/bootstrap.min.css">
    <script src="https://ajax.googleapis.com/ajax/libs/jquery/3.4.1/jquery.min.js"></script>
    <title>JS Email</title>
</head>

<body>
    <header class="jumbotron">
        <div class="container">
            <div class="row">
                <div class="col-12 col-sm-12 text-center">
                    <h1>Send Email through JavaScript</h1>
                </div>
            </div>
        </div>
    </header>
    <div class="container-fluid">
        <div class="row">
            <div class="col col-sm"></div>
            <div class="col-sm-6 col-12">
                <label for="task">Task Description: </label>
                <input type="text" id="task" class="form-control" required>
                <div class="row">
                    <div class="col-sm-6 col-12">
                        <label for="assigneeName">Assignee Name: </label>
                        <input type="text" id="assigneeName" class="form-control" required>
                    </div>
                    <div class="col-sm-6 col-12">
                        <label for="assigneeEmail">Assignee Email:</label>
                        <input type="email" id="assigneeEmail" class="form-control" required>
                    </div>
                </div>

                <label for="dueDate">Due Date: </label>
                <input type="date" id="dueDate" class="form-control" required>
                <button type="button" class="btn btn-success mt-1">Add Task</button>
            </div>
            <div class="col col-sm"></div>
        </div>
        <hr>
        <div class="row">

        </div>
    </div>
    <script src="https://cdnjs.cloudflare.com/ajax/libs/popper.js/1.14.7/umd/popper.min.js"></script>
    <script src="https://maxcdn.bootstrapcdn.com/bootstrap/4.3.1/js/bootstrap.min.js"></script>
</body>

</html>
The above given code snippet setups the layout of the app. Now let us add the functionality. After filling the required information, when the user clicks on the Add Task button, the task should be added to the DOM (Document Object Model) as a Bootstrap card. For this purpose, let’s write JavaScript code first.
Adding JavaScript
Let’s add the JavaScript to bring life to the app. Create a file named app.js and add the code given below.
//add button
const addBtn = document.querySelector('button');
//the row where cards will be appended
const taskDiv = document.querySelectorAll('div.row')[3];
//Retrieve from Local Storage
taskDiv.innerHTML = localStorage.getItem('tasks');
//task description input element
const taskDescription = document.querySelector('#task');
//assignee name input element
const assigneeName = document.querySelector('#assigneeName');
//assignee emal input element
const assigneEmail = document.querySelector('#assigneeEmail');
//due date input element
const dueDate = document.querySelector('#dueDate');

//Click listener for add button
addBtn.addEventListener('click', () => {
    //Create a new div
    let div = document.createElement('div');
    //Add class to div
    div.className = 'col-12 col-sm-4 mt-1';
    //Create a div for bootstrap card
    let card = document.createElement('div');
    //Add card class
    card.className = 'card';
    //Create card head
    let cardHead = document.createElement('div');
    //add card header class
    cardHead.className = 'card-header';
    //create card body
    let cardBody = document.createElement('div');
    cardBody.className = 'card-body';
    //create card footer
    let cardFoot = document.createElement('div');
    cardFoot.className = 'card-footer';
    //Append the card components to the card div
    card.appendChild(cardHead);
    card.appendChild(cardBody);
    card.appendChild(cardFoot);
    //Create h2 Element for assignee name display
    let name = document.createElement('h2');
    //get value from name input field
    name.className = 'name';
    //due date element
    let datee = document.createElement('h3');
    //get value from date input field
    datee = dueDate.value;
    //Set assignee name and date
    name.innerHTML = assigneeName.value + '<small class="text-danger pl-1">Due: ' + datee + '</small>';
    cardHead.appendChild(name);
    //Create element for p which is task description
    let desc = document.createElement('p');
    desc.textContent = taskDescription.value;
    //Append the description to card body element
    cardBody.appendChild(desc);
    //Create a button for card to send email
    let sendBtn = document.createElement('button');
    sendBtn.className = 'btn btn-info';
    sendBtn.textContent = 'Send Mail';
    //Assign the data-email attribute to store the email value
    sendBtn.setAttribute('data-email', assigneEmail.value);
    cardFoot.appendChild(sendBtn);
    div.appendChild(card);
    taskDiv.appendChild(div);
    //store to local storage
    localStorage.setItem('tasks', taskDiv.innerHTML);
});
});
The above piece of code is doing the following things:
- It gets the values from the input fields.
- A click listener is written for click event of Add Task button.
- The click listener dynamically adds the new task card.
Setting Up the emailjs account for sending email
Sign up for the account here.
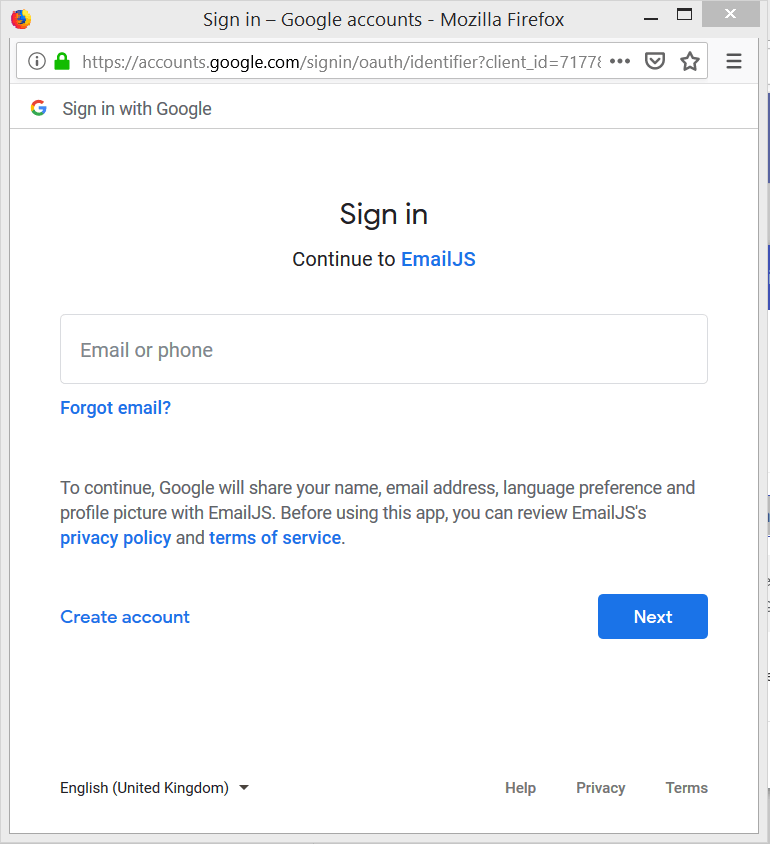
Add the Personal Email Gmail as service and Connect your account.
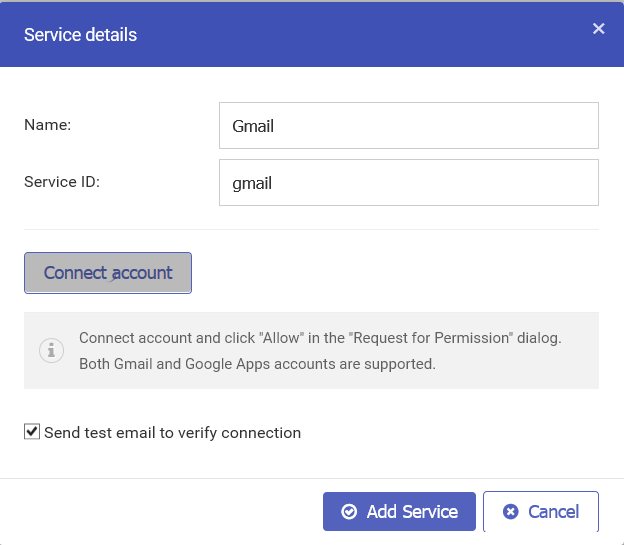
Provide the required details
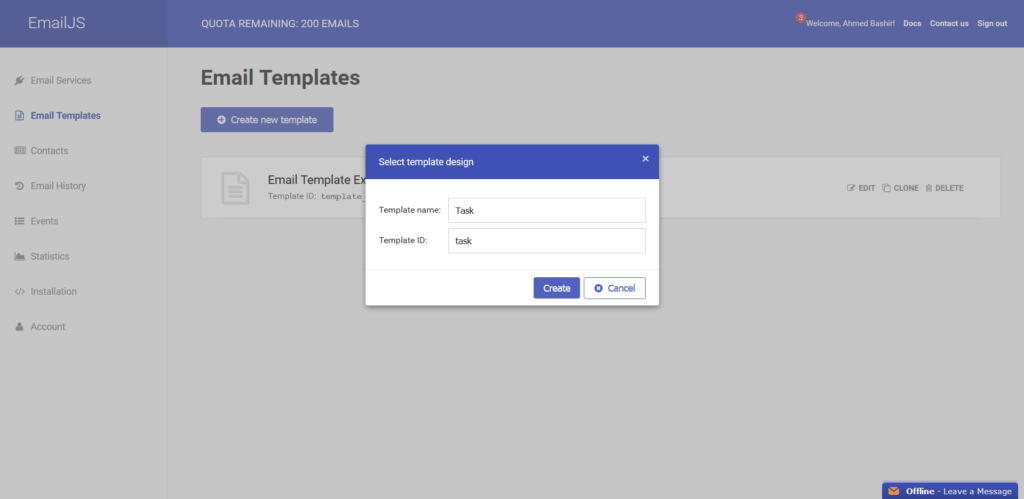
Click on the Email Templates tab and Add New Template with name Task.
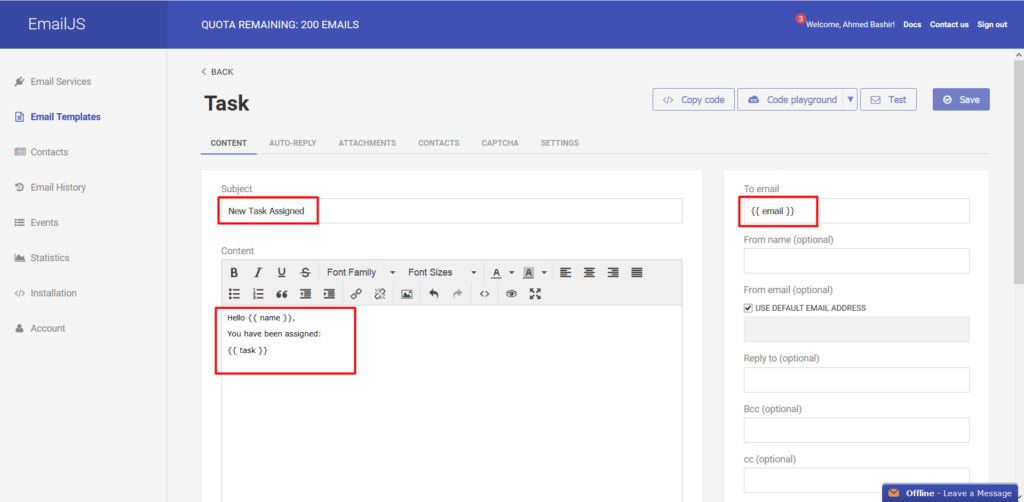
Set the email template as shown in the figure below:
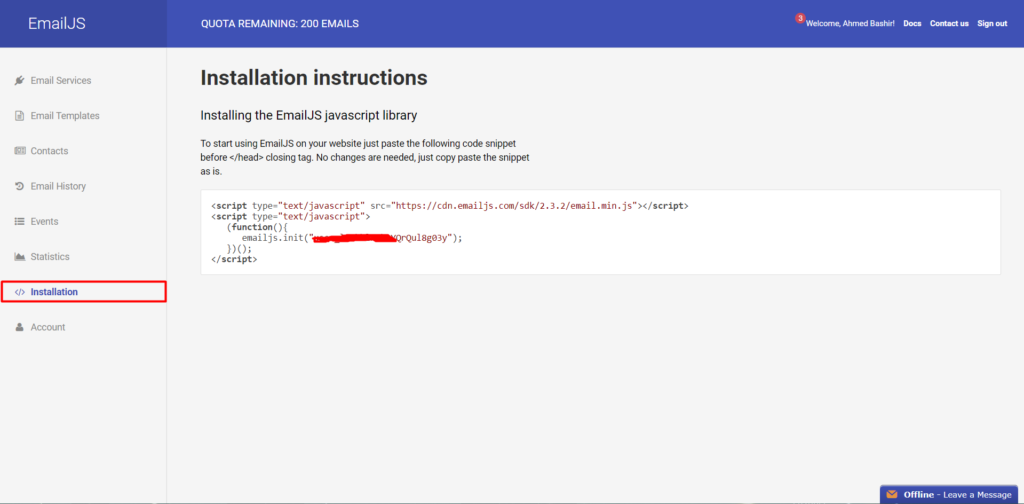
Click on the Installation option as shown in the picture below and add the code snippet to <head> of your index.html file.
Also add the app.js file to your index.html file before the closing tag of body.
Now, in your app.js file, add the following piece of code:
taskDiv.addEventListener('click', function() {
    if (event.target.tagName == 'BUTTON') {
        let p = event.target.parentElement.parentElement;
        let n = p.firstElementChild.textContent;
        let nm = (n.substr(0, n.indexOf("Due:")));
        let t = p.children[1].firstElementChild.textContent;
        console.log(t);
        var templateParams = {
            email: event.target.getAttribute('data-email'),
            name: nm,
            task: t
        };
        emailjs.send('default_service', 'task', templateParams);
    }
});
The above given code sets the email parameters to be sent.
This is how your index.html and app.js file will look like:
<!DOCTYPE html>
<html lang="en">
<head>
    <!-- Required meta tags always come first -->
    <meta charset="utf-8">
    <meta name="viewport" content="width=device-width, initial-scale=1, shrink-to-fit=no">
    <meta http-equiv="x-ua-compatible" content="ie=edge">
    <link rel="stylesheet" href="https://maxcdn.bootstrapcdn.com/bootstrap/4.3.1/css/bootstrap.min.css">
    <script src="https://ajax.googleapis.com/ajax/libs/jquery/3.4.1/jquery.min.js"></script>
    <script type="text/javascript">
        (function() {
            emailjs.init("YOUR USER ID");
        })();
    </script>
    <title>JS Email</title>
</head>

<body>
    <header class="jumbotron">
        <div class="container">
            <div class="row">
                <div class="col-12 col-sm-12 text-center">
                    <h1>Send Email through JavaScript</h1>
                </div>
            </div>
        </div>
    </header>
    <div class="container-fluid">
        <div class="row">
            <div class="col col-sm"></div>
            <div class="col-sm-6 col-12">
                <label for="task">Task Description: </label>
                <input type="text" id="task" class="form-control" required>
                <div class="row">
                    <div class="col-sm-6 col-12">
                        <label for="assigneeName">Assignee Name: </label>
                        <input type="text" id="assigneeName" class="form-control" required>
                    </div>
                    <div class="col-sm-6 col-12">
                        <label for="assigneeEmail">Assignee Email:</label>
                        <input type="email" id="assigneeEmail" class="form-control" required>
                    </div>
                </div>

                <label for="dueDate">Due Date: </label>
                <input type="date" id="dueDate" class="form-control" required>
                <button type="button" class="btn btn-success mt-1">Add Task</button>
            </div>
            <div class="col col-sm"></div>
        </div>
        <hr>
        <div class="row">

        </div>
    </div>
    <script src="https://cdnjs.cloudflare.com/ajax/libs/popper.js/1.14.7/umd/popper.min.js"></script>
    <script src="https://maxcdn.bootstrapcdn.com/bootstrap/4.3.1/js/bootstrap.min.js">
</script>
    <script src = "app.js"></script>
</body>
</html>
app.js
//add button
const addBtn = document.querySelector('button');
//the row where cards will be appended
const taskDiv = document.querySelectorAll('div.row')[3];
//Retrieve from Local Storage
taskDiv.innerHTML = localStorage.getItem('tasks');
//task description input element
const taskDescription = document.querySelector('#task');
//assignee name input element
const assigneeName = document.querySelector('#assigneeName');
//assignee emal input element
const assigneEmail = document.querySelector('#assigneeEmail');
//due date input element
const dueDate = document.querySelector('#dueDate');

//Click listener for add button
addBtn.addEventListener('click', () => {
    //Create a new div
    let div = document.createElement('div');
    //Add class to div
    div.className = 'col-12 col-sm-4 mt-1';
    //Create a div for bootstrap card
    let card = document.createElement('div');
    //Add card class
    card.className = 'card';
    //Create card head
    let cardHead = document.createElement('div');
    //add card header class
    cardHead.className = 'card-header';
    //create card body
    let cardBody = document.createElement('div');
    cardBody.className = 'card-body';
    //create card footer
    let cardFoot = document.createElement('div');
    cardFoot.className = 'card-footer';
    //Append the card components to the card div
    card.appendChild(cardHead);
    card.appendChild(cardBody);
    card.appendChild(cardFoot);
    //Create h2 Element for assignee name display
    let name = document.createElement('h2');
    //get value from name input field
    name.className = 'name';
    //due date element
    let datee = document.createElement('h3');
    //get value from date input field
    datee = dueDate.value;
    //Set assignee name and date
    name.innerHTML = assigneeName.value + '<small class="text-danger pl-1">Due: ' + datee + '</small>';
    cardHead.appendChild(name);
    //Create element for p which is task description
    let desc = document.createElement('p');
    desc.textContent = taskDescription.value;
    //Append the description to card body element
    cardBody.appendChild(desc);
    //Create a button for card to send email
    let sendBtn = document.createElement('button');
    sendBtn.className = 'btn btn-info';
    sendBtn.textContent = 'Send Mail';
    //Assign the data-email attribute to store the email value
    sendBtn.setAttribute('data-email', assigneEmail.value);
    cardFoot.appendChild(sendBtn);
    div.appendChild(card);
    taskDiv.appendChild(div);
    //store to local storage
    localStorage.setItem('tasks', taskDiv.innerHTML);
});

taskDiv.addEventListener('click', function() {
    if (event.target.tagName == 'BUTTON') {
        let p = event.target.parentElement.parentElement;
        let n = p.firstElementChild.textContent;
        let nm = (n.substr(0, n.indexOf("Due:")));
        let t = p.children[1].firstElementChild.textContent;
        console.log(t);
        var templateParams = {
            email: event.target.getAttribute('data-email'),
            name: nm,
            task: t
        };
        emailjs.send('default_service', 'task', templateParams);
    }
});
Create a new task and add the task. Like the following:

Click on Send Mail and the email will be sent to the user with the task details.
Thank you for reading, please comment if you have any question.
Here’re some more related articles:
— Realtime moving Cars on Google Maps JavaScript & Google Firebase