RecyclerView Loading With Facebook Shimmer Effect Android Example
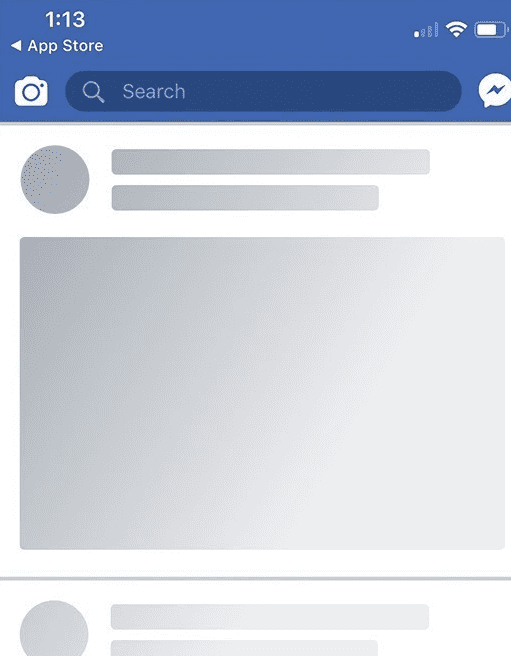
As an Android user and developer, I am always attracted to great apps with nice and meaningful animations. To me, such apps not only deliver great features to make their user life easier but also their experience to the next level from the team behind them. I often really like those animation and also try to make those great features in my own application. One of those apps is Facebook which offers a great Shimmer effect.
Shimmer effect was created by Facebook to show loading status instead of showing ProgressBar. In this article, I’m going to take you through my journey of replacing the ProgressBar with Shimmer effect.
App Intro
To replicate the Facebook Shimmer animation, I built a simple app where we’re gonna execute movies fetching network request. We’re gonna hit an URL and download Json data and show in a GridView. While application fetching movies instead of showing ProgressBar, we’re gonna show the Shimmering effect and in successful or in error case stop the effect.
Gradle Stuff
Facebook Shimmer effect requires us to add some more stuff to our application modules build.gradle file. We start by adding the following dependencies right after the android section:
// Facebook shimmer effect dependency
implementation 'com.facebook.shimmer:shimmer:0.1.0@aar'

// Retrofit dependency
implementation 'com.squareup.retrofit2:retrofit:2.3.0'
implementation 'com.squareup.retrofit2:converter-gson:2.3.0'
implementation 'com.squareup.okhttp3:logging-interceptor:3.9.1'

// Picasso dependency
implementation 'com.squareup.picasso:picasso:2.5.2'

// ViewModel dependencies
implementation 'android.arch.lifecycle:viewmodel:1.1.1'
implementation 'android.arch.lifecycle:extensions:1.1.1'
I’m not going to try to explain the inner working of an application in this post, but instead, show you a simple way of how to use Facebook Shimmer. So, enough of this intro let’s start the example by seeing the activity_main.xml file.
<?xml version="1.0" encoding="utf-8"?>
<RelativeLayout
        xmlns:android="http://schemas.android.com/apk/res/android"
        xmlns:tools="http://schemas.android.com/tools"
        xmlns:shimmer="http://schemas.android.com/apk/res-auto"
        android:layout_width="match_parent"
        android:layout_height="match_parent"
        tools:context=".activities.MainActivity">

    // 1
    <com.facebook.shimmer.ShimmerFrameLayout
            android:layout_width="match_parent"
            android:layout_height="match_parent"
            android:id="@+id/parentShimmerLayout"
            shimmer:duration="700">
        // 2
        <LinearLayout
                android:layout_width="match_parent"
                android:layout_height="wrap_content"
                android:orientation="vertical">

            <include layout="@layout/single_movie_view"/>

            <include layout="@layout/single_movie_view"/>

            <include layout="@layout/single_movie_view"/>

        </LinearLayout>

    </com.facebook.shimmer.ShimmerFrameLayout>

    // 3
    <android.support.v7.widget.RecyclerView
            android:id="@+id/moviesRecyclerView"
            android:layout_width="match_parent"
            android:layout_height="match_parent"
            android:scrollbarSize="1dp"
            android:scrollbarStyle="insideInset"
            android:scrollbars="vertical"/>

</RelativeLayout>
Below is an explanation of the above code.
- We need to use the
ShimmerFrameLayoutclass which extends from AndroidFrameLayout, and we can nest our own layout controls inside the layout to achieve the shimmer effect. The duration property is for to set the interval of the animation in milliseconds. - In this
LinearLayout, we need to include blank layouts so that the when our application executing the network request theShimmerFrameLayoutperforms shimmering on these blank layouts. The blank layouts need to be single_item_view of the list. - The
RecyclerViewis responsible for showing the list of movies when the application successfully download the json content from theTheMovieDb
Single Movie ItemView
Every single entry in a list has a movie image and two texts line. The following shows the single_item_view.xml file.
<?xml version="1.0" encoding="utf-8"?>
<android.support.v7.widget.CardView xmlns:android="http://schemas.android.com/apk/res/android"
         android:layout_width="match_parent"
         android:layout_marginStart="10dp"
         android:layout_height="wrap_content"
         android:layout_marginLeft="10dp">

        <LinearLayout android:layout_width="match_parent"
                      android:layout_height="wrap_content"
                      android:orientation="vertical">

              <FrameLayout android:layout_width="match_parent"
                           android:background="@color/colorGrey"
                           android:layout_height="160dp">

                           <ImageView android:id="@+id/leftMoviePosterImageView"
                                      android:layout_width="match_parent"
                                      android:layout_height="match_parent"
                                      android:contentDescription="@null"
                                      android:scaleType="centerCrop"/>
                           <TextView  android:id="@+id/leftMovieRatingTextView"
                                      android:layout_width="wrap_content"
                                      android:layout_height="wrap_content"
                                      android:layout_gravity="end|bottom"
                                      android:layout_marginBottom="10dp"
                                      android:layout_marginEnd="10dp"
                                      android:textColor="#fff"
                                      android:textSize="13sp"
                                      android:layout_marginRight="10dp"/>
              </FrameLayout>

                          <TextView android:id="@+id/leftMovieTitleTextView"
                                    android:layout_width="match_parent"
                                    android:layout_height="wrap_content"
                                    android:layout_margin="10dp"
                                    android:background="@color/colorGrey"
                                    android:textColor="#BDBDBD"
                                    android:textSize="14sp"
                                    android:textStyle="bold"/>
     </LinearLayout>

</android.support.v7.widget.CardView>
The only thing I need to point out in the above xml is background color in FrameLayout and in TextView. You see if we did not set the background color then we’re not able to see the shimmering effect because of the View default background color is white. For the above application, the background color is #dddddd. By adding the background color the single movie view looks like this:
MainActivity
Now the only thing we require is to do, to execute the network request. While the request is being executed start the shimmer effect and when the response came, stop the shimmering effect. Below is the MainActivity class.
class MainActivity : AppCompatActivity() {

    private lateinit var viewModel: MainActivityViewModel
    private val movies = mutableListOf<CustomMovieModel>()

    private val picasso = lazy {
        Picasso.with(this)
    }

    private val lazy MovieAdapter = lazy {
        MovieAdapter(this, movies, picasso.value)
    }

    override fun onCreate(savedInstanceState: Bundle?) {
          super.onCreate(savedInstanceState)
          setContentView(R.layout.activity_main)
          viewModel = ViewModelProviders.of(this).get(MainActivityViewModel::class.java)
          parentShimmerLayout.startShimmerAnimation()
          viewModel.makeGetMovieCall()
          moviesRecyclerView.layoutManager = LinearLayoutManager(this)
          moviesRecyclerView.adapter = lazyMovieAdapter.value
          startListenToMovies()
    }

    private fun startListenToMovies() {
        viewModel.newMovies
            .nonNull()
            .observe(this) {
                parentShimmerLayout.visibility = View.GONE
                parentShimmerLayout.stopShimmerAnimation()
                movies.addAll(it)
                lazyMovieAdapter.value.notifyDataSetChanged()
            }
    }

    override fun onStop() {
        super.onStop()
        parentShimmerLayout.stopShimmerAnimation()
    }
}
In order to start the shimmering effect, you need to call startShimmerAnimation method. You see we’re starting the shimmering animation before executing the network request and stop the effect when the response came. In order to stop the effect call the stopShimmerAnimation method. To download the Json movies content I have added Retrofit Client.
The complete source code of the above application is on GitHub.
Alright, guy’s, this was my demonstration of how we can use Facebook Shimmer effect in our Android application. If you ❤️ like please share it with the Android Community and for suggestions and reviews do comment below.
Thank you for being here and keep reading…


