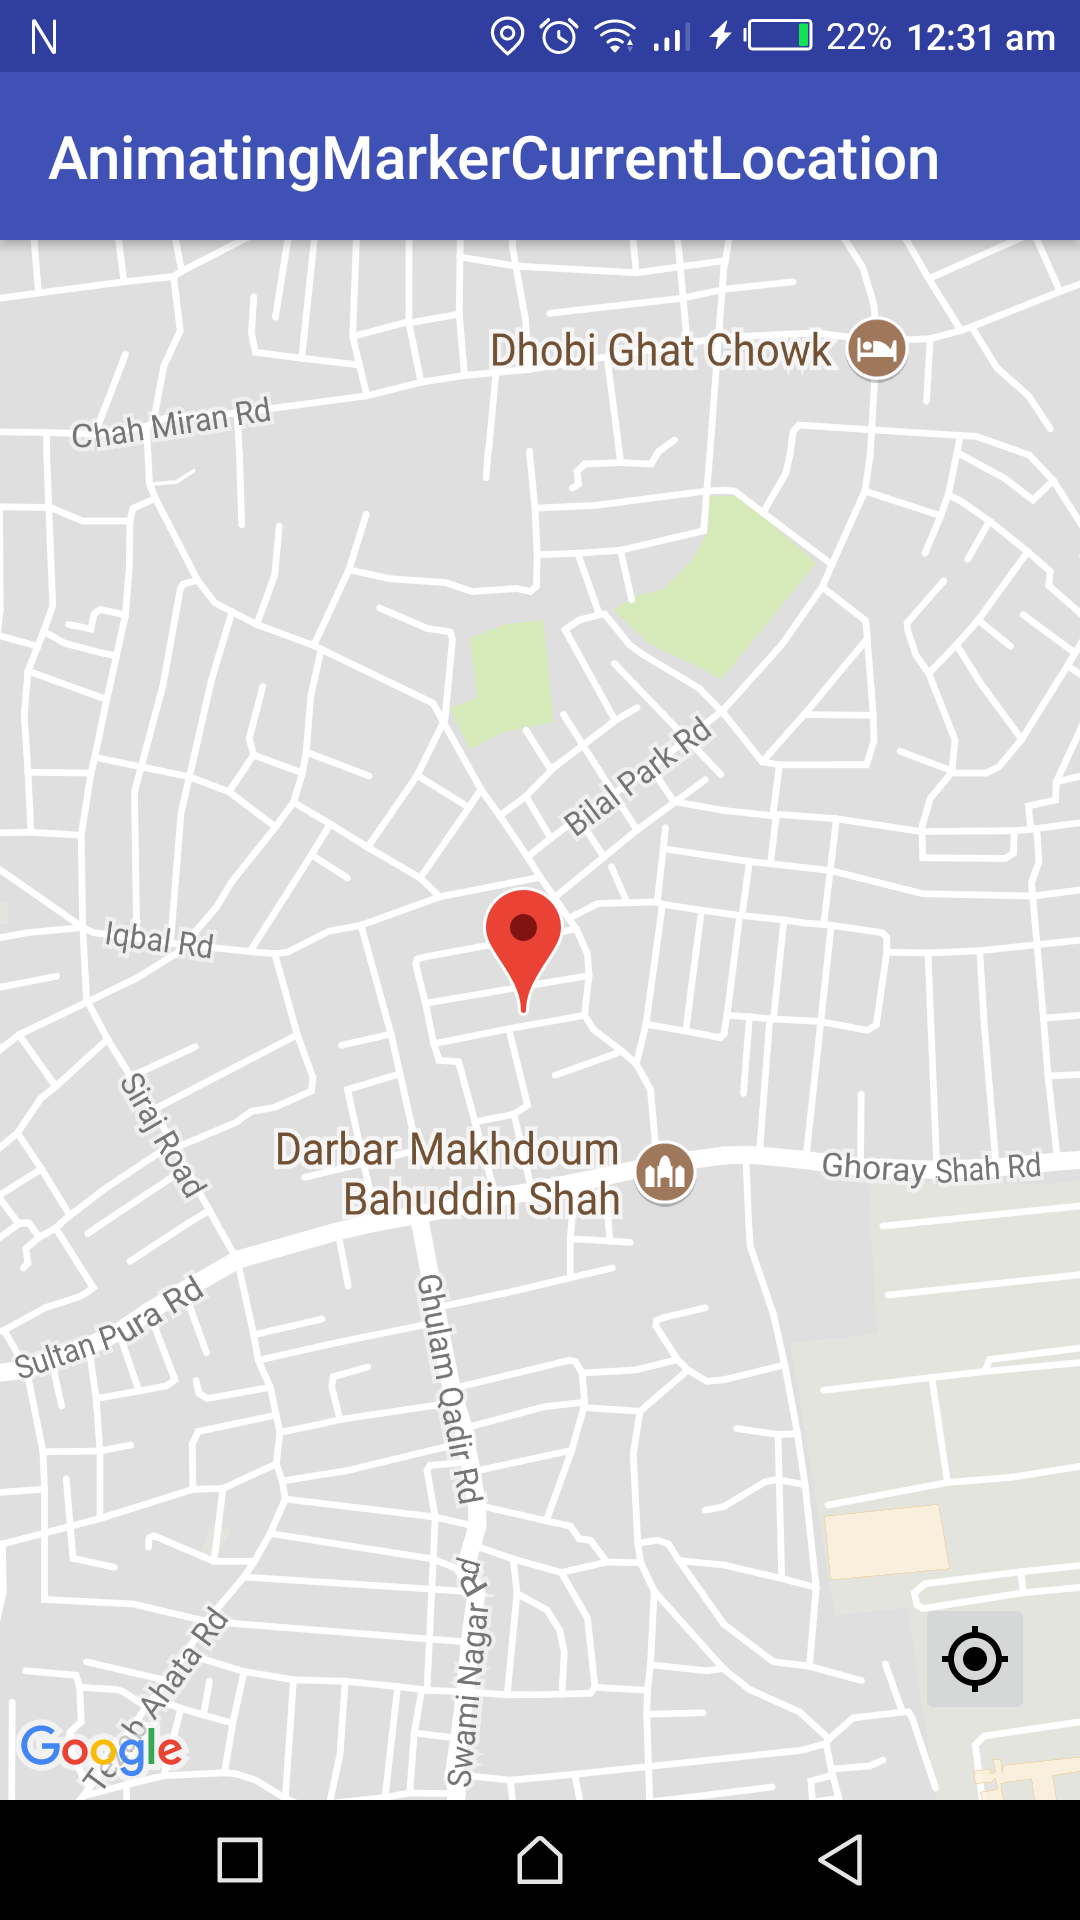
Android Example : Animate marker on Google map with current location
Hi, guys today we’re going to see how we can animate marker on google map with user current location. In this blog, we’re going to use the Google Map API for google maps. I’m not going to show how you can get Google Map API from Google Console. If you want to see how to get Google MAP API to see this on my blog. So, without further ado let’s dive into AndroidStudio and do some coding.
Android App Setup
First, open your app level build.gradle file and add the dependency for location and google map.
implementation 'com.google.android.gms:play-services-location:15.0.1'
implementation 'com.google.android.gms:play-services-maps:15.0.1'
Now open the Manifest file and add permission for Location and Internet.
<uses-permission android:name="android.permission.ACCESS_COARSE_LOCATION" />
<uses-permission android:name="android.permission.ACCESS_FINE_LOCATION" />
<uses-permission android:name="android.permission.INTERNET" />
Now add the meta tag in the Manifest file for Google Map API and for play services version.
<meta-data
    android:name="com.google.android.geo.API_KEY"
    android:value="Aalza*******************************qw23" />    // Replace this with your google map api key

<meta-data
    android:name="com.google.android.gms.version"
    android:value="@integer/google_play_services_version" />
Add SupportMapFragment to your xml file where you want to show Google Map. Below is the xml file.
<?xml version="1.0" encoding="utf-8"?>
<RelativeLayout xmlns:android="http://schemas.android.com/apk/res/android"
    xmlns:tools="http://schemas.android.com/tools"
    android:layout_width="match_parent"
    android:layout_height="match_parent"
    tools:context=".MainActivity">

    <fragment
        android:id="@+id/mapFragment"
        class="com.google.android.gms.maps.SupportMapFragment"
        android:layout_width="match_parent"
        android:layout_height="match_parent" />

    <ImageButton
        android:id="@+id/currentLocationImageButton"
        android:layout_width="40dp"
        android:layout_height="wrap_content"
        android:layout_alignParentBottom="true"
        android:layout_alignParentEnd="true"
        android:layout_marginBottom="25dp"
        android:layout_marginEnd="15dp"
        android:contentDescription="@null"
        android:src="@drawable/current_location_vector_icon" />

</RelativeLayout>
As you can see the xml file is much simpler. In here we have SupportMapFragment and current location button. The button is for when user taps on, it navigates to the current location on the map.
Done with the xml file now go to your java file in onCreate method get the SupportMapFragment object and add OnMapReadyCallack. Below is the code for SupportMapFragment.
SupportMapFragment supportMapFragment = (SupportMapFragment) getSupportFragmentManager().findFragmentById(R.id.mapFragment);
supportMapFragment.getMapAsync(this);
Below is the overriding method of OnMapReadyCallback in java file.
@Override
public void onMapReady(GoogleMap googleMap) {
    this.googleMap = googleMap;
}
We need to save the instance of GoogleMaps because later we have to set the current location and marker reference on it.
Now we have to see if the user has previously installed GooglePlayServices on his/her mobile. It’s a good approach that you check GooglePlayServices installed or not. Below is the code for checking GooglePlayServices.
@Override
protected void onResume() {
 super.onResume();
 if (isGooglePlayServicesAvailable()) {
 fusedLocationProviderClient = LocationServices.getFusedLocationProviderClient(this);
 startCurrentLocationUpdates();
 }
}
You can add this code in the onResume method. isGooglePlayServicesAvailable is our custom method to check that GooglePlayServices available or not. If the user does not have GooglePlayServices then we simply show a Toast else we start current location updates.
Below is the isGooglePlayServicesAvailable method.
private boolean isGooglePlayServicesAvailable() {
    GoogleApiAvailability googleApiAvailability = GoogleApiAvailability.getInstance();
    int status = googleApiAvailability.isGooglePlayServicesAvailable(this);
    if (ConnectionResult.SUCCESS == status)
        return true;
    else {
        if (googleApiAvailability.isUserResolvableError(status))
            Toast.makeText(this, "Please Install google play services to use this application", Toast.LENGTH_LONG).show();
    }
    return false;
}
GoogleApiAvailability is the utility class to check GooglePlayServices availability. If you want to learn more about GoogleApiAvailability class see this link.
Below is the startCurrentLocationUpdates method.
private void startCurrentLocationUpdates() {
    LocationRequest locationRequest = LocationRequest.create();
    locationRequest.setPriority(LocationRequest.PRIORITY_HIGH_ACCURACY);
    locationRequest.setInterval(3000);
    if (Build.VERSION.SDK_INT >= Build.VERSION_CODES.M) {
        if (ActivityCompat.checkSelfPermission(this, android.Manifest.permission.ACCESS_FINE_LOCATION) != PackageManager.PERMISSION_GRANTED && ActivityCompat.checkSelfPermission(this, android.Manifest.permission.ACCESS_COARSE_LOCATION) != PackageManager.PERMISSION_GRANTED) {
            ActivityCompat.requestPermissions(MainActivity.this,
                    new String[]{Manifest.permission.ACCESS_FINE_LOCATION},
                    MY_PERMISSIONS_REQUEST_ACCESS_FINE_LOCATION);
            return;
        }
    }
    fusedLocationProviderClient.requestLocationUpdates(locationRequest, mLocationCallback, Looper.myLooper());
}
LocationRequest is the class to tell how much time interval we need after every location and also we can set location Accuracy with the LocationRequest. In here we’re also checking if the app has the location permission or not. If not then we’re asking runtime permission for location else it continues. Now we just need the LocationCallback class object which we’re passing in when requesting location updates.
private final LocationCallback mLocationCallback = new LocationCallback() {

    @Override
    public void onLocationResult(LocationResult locationResult) {
        super.onLocationResult(locationResult);
        if (locationResult.getLastLocation() == null)
            return;
        currentLocation = locationResult.getLastLocation();
        if (firstTimeFlag && googleMap != null) {
            animateCamera(currentLocation);
            firstTimeFlag = false;
        }
        showMarker(currentLocation);
    }
};
You see in here we’re saving user location in our currentLocation object because we need the location for when user tap on current location button. After that, we check if firstTimeFlag is a true and googleMap instance not null. I’m checking this condition because when the app opens we need to animate GoogleMaps to user current location. This if condition true only first time.
Below is the code for animateCamera method.
private void animateCamera(@NonNull Location location) {
    LatLng latLng = new LatLng(location.getLatitude(), location.getLongitude());
    googleMap.animateCamera(CameraUpdateFactory.newCameraPosition(getCameraPositionWithBearing(latLng)));
}
Below is the code for showMarker method.
private void showMarker(@NonNull Location currentLocation) {
    LatLng latLng = new LatLng(currentLocation.getLatitude(), currentLocation.getLongitude());
    if (currentLocationMarker == null)
        currentLocationMarker = googleMap.addMarker(new MarkerOptions().icon(BitmapDescriptorFactory.defaultMarker()).position(latLng));
    else
        MarkerAnimation.animateMarkerToGB(currentLocationMarker, latLng, LatLngInterpolator.Spherical());
}
Note: This is the main part of our blog. In here first, we check if the currentLocationMarker equal to null. Then we simply add a new marker on the map. If not then we call our AnimatingMarkerHelper class to animate the marker from the previous location to user new location.
Below is the code of AnimatingMarkerHelper.java class.
public class MarkerAnimation {

    public static void animateMarkerToGB(final Marker marker, final LatLng finalPosition, final LatLngInterpolator latLngInterpolator) {
        final LatLng startPosition = marker.getPosition();
        final Handler handler = new Handler();
        final long start = SystemClock.uptimeMillis();
        final Interpolator interpolator = new AccelerateDecelerateInterpolator();
        final float durationInMs = 2000;

        handler.post(new Runnable() {
            long elapsed;
            float t;
            float v;

            @Override
            public void run() {
                // Calculate progress using interpolator
                elapsed = SystemClock.uptimeMillis() - start;
                t = elapsed / durationInMs;
                v = interpolator.getInterpolation(t);

                marker.setPosition(latLngInterpolator.interpolate(v, startPosition, finalPosition));

                // Repeat till progress is complete.
                if (t < 1) {
                    // Post again 16ms later.
                    handler.postDelayed(this, 16);
                }
            }
        });
    }
}
In the animateMarkerToGB method, we’re passing LatLngInterpolator instance. Below is the LatLngInterpolator class.
public interface LatLngInterpolator {

    LatLng interpolate(float fraction, LatLng a, LatLng b);

    class Spherical implements LatLngInterpolator {

        /* From github.com/googlemaps/android-maps-utils */
        @Override
        public LatLng interpolate(float fraction, LatLng from, LatLng to) {
            // http://en.wikipedia.org/wiki/Slerp
            double fromLat = toRadians(from.latitude);
            double fromLng = toRadians(from.longitude);
            double toLat = toRadians(to.latitude);
            double toLng = toRadians(to.longitude);
            double cosFromLat = cos(fromLat);
            double cosToLat = cos(toLat);

            // Computes Spherical interpolation coefficients.
            double angle = computeAngleBetween(fromLat, fromLng, toLat, toLng);
            double sinAngle = sin(angle);
            if (sinAngle < 1E-6) {
                return from;
            }
            double a = sin((1 - fraction) * angle) / sinAngle;
            double b = sin(fraction * angle) / sinAngle;

            // Converts from polar to vector and interpolate.
            double x = a * cosFromLat * cos(fromLng) + b * cosToLat * cos(toLng);
            double y = a * cosFromLat * sin(fromLng) + b * cosToLat * sin(toLng);
            double z = a * sin(fromLat) + b * sin(toLat);

            // Converts interpolated vector back to polar.
            double lat = atan2(z, sqrt(x * x + y * y));
            double lng = atan2(y, x);
            return new LatLng(toDegrees(lat), toDegrees(lng));
        }

        private double computeAngleBetween(double format, double fromLng, double toLat, double toLng) {
            // Haversine's formula
            double dLat = fromLat - toLat;
            double dLng = fromLng - toLng;
            return 2 * asin(sqrt(pow(sin(dLat / 2), 2) +
                    cos(fromLat) * cos(toLat) * pow(sin(dLng / 2), 2)));
        }
    }
}
Now it’s a good approach that you stopped the location updates in the onStop method. Below is the code how to stop location updates.
@Override
protected void onStop() {
    super.onStop();
    if (fusedLocationProviderClient != null)
        fusedLocationProviderClient.removeLocationUpdates(mLocationCallback);
}
That’s it, this is the complete example of how to animate marker on google maps. For complete source code of the above example see it on GitHub. If you guy’s want to learn how to show current location on GoogleMapStreetView see this example.
I hope this blog gives you a good understanding of how to animate a marker on google map. If you’ve any queries please do comment below.
Thank you for being here and keep reading…


Hi there!
Great job with this!
I have a question for you. What should add in the code to put a new marker when location in changed? For example if I move 3 times put 3 markers on the map. Or if it’s not posible every time location is changing at least at 15-20 seconds.
Can you help me with this?
Thank you and keep up the good work!
Hey Paul,
First, I need to ask why you want add new marker every time your location changed? You should consider to add Polylines.
Hi, thanks for the code and the marker is moving to the new location but the marker is not moving to the screen center as seen in your video.
Binu
Hey Binu,
First of all the marker is not moving on the screen. I’m swiping which is not visible in the video. So, the answer to your question you can simply update your camera position when you animating your marker with the following code.
CameraPosition cameraPosition = new CameraPosition.Builder()
.target(latLng)
.zoom(20)
.build();
mMap.moveCamera(CameraUpdateFactory.newCameraPosition(cameraPosition));
Let me know if this helps.