Login page in Asp.net Core MVC with Database
Hey guys, In this tutorial I’m going to create a Login page in Asp.net MVC.
This is the 5th Part of Admin Panel Tutorial Series.
- Choosing Template for Admin Panel
- Creating a Database
- Setup AdminLTE Template in Asp.net Core MVC project
- Creating Models
- Login Page for Admin Panel
- CRUD(Create, Read, Update, Delete) Operations
- Creating Interactive Dashboards
- Audit Trail / Activity Logging
- Role-Based Authorization
- Error Logging
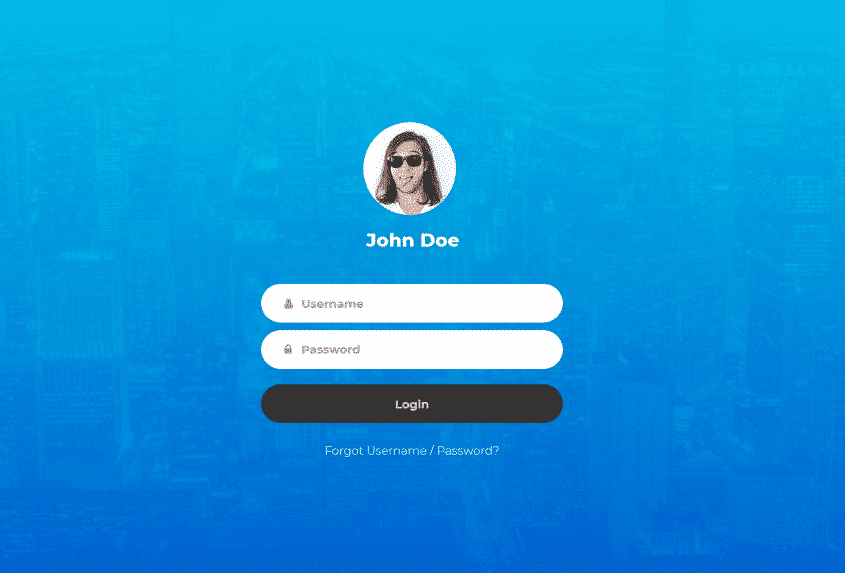
There are many Login pages designs are available, you can use of your choice. For this tutorial, I’m going to use This Beautiful Login page by colorlib.
So, If you have not even created your Asp.net Core project then your first step is to create an Empty project using this command
dotnet new Web
& don’t forget to create these Four folders “Controllers”, “Models”, “Views” & “wwwroot”. Add this code to your “Startup.cs” to ready your project for using MVC
using System;
using System.Collections.Generic;
using System.Linq;
using System.Threading.Tasks;
using Microsoft.AspNetCore.Builder;
using Microsoft.AspNetCore.Hosting;
using Microsoft.AspNetCore.Http;
using Microsoft.Extensions.DependencyInjection;

namespace AdminPanelTutorial
{
    public class Startup
    {
        public void ConfigureServices(IServiceCollection services)
        {
            services.AddMvc();
        }

        // This method gets called by the runtime. Use this method to configure the HTTP request pipeline.
        public void Configure(IApplicationBuilder app, IHostingEnvironment env)
        {
            if (env.IsDevelopment())
            {
                app.UseDeveloperExceptionPage();
            }

            app.UseStaticFiles();

            app.UseMvc(routes =>
            {
                routes.MapRoute(
                    name: "default",
                    template: "{controller=Home}/{action=Index}/{id?}");
            });
        }
    }
}
Downloading Login Page Template
Now, you need to download Login page Code from Colorlib. So download from here => Login Form 12 by Colorlib
unzip the folder and you’ll find these folders & file

Copy all folders from here and paste in the “wwwroot” folder of your Asp.net Core MVC project.
Now, create a Controller as “AccountController.cs” inside your Controllers Folder & Add this code.
using Microsoft.AspNetCore;
using Microsoft.AspNetCore.Hosting;
using Microsoft.AspNetCore.Mvc;

namespace AdminPanelTutorial
{
    public class AccountController : Controller
    {
        public IActionResult Login()
        {
            return View();
        }
    }
}
Create a new Folder into Views as “Account” & inside this Folder create a file as “Login.cshtml” and put this code
@{
   Layout=null;
}

<!DOCTYPE html>
<html lang="en">
<head>
  <title>Login V12</title>
  <meta charset="UTF-8">
  <meta name="viewport" content="width=device-width, initial-scale=1">
<!--===============================================================================================-->
  <link rel="icon" type="image/png" href="~/images/icons/favicon.ico"/>
<!--===============================================================================================-->
  <link rel="stylesheet" type="text/css" href="~/vendor/bootstrap/css/bootstrap.min.css">
<!--===============================================================================================-->
  <link rel="stylesheet" type="text/css" href="~/fonts/font-awesome-4.7.0/css/font-awesome.min.css">
<!--===============================================================================================-->
  <link rel="stylesheet" type="text/css" href="~/fonts/Linearicons-Free-v1.0.0/icon-font.min.css">
<!--===============================================================================================-->
  <link rel="stylesheet" type="text/css" href="~/vendor/animate/animate.css">
<!--===============================================================================================-->
  <link rel="stylesheet" type="text/css" href="~/vendor/css-hamburgers/hamburgers.min.css">
<!--===============================================================================================-->
  <link rel="stylesheet" type="text/css" href="~/vendor/select2/select2.min.css">
<!--===============================================================================================-->
  <link rel="stylesheet" type="text/css" href="~/css/util.css">
  <link rel="stylesheet" type="text/css" href="~/css/main.css">
<!--===============================================================================================-->
</head>
<body>

  <div class="limiter">
    <div class="container-login100" style="background-image: url('../images/img-01.jpg');">
      <div class="wrap-login100 p-t-50 p-b-0">
        <form class="login100-form validate-form">
          <div class="login100-form-avatar">
            <img src="~/images/avatar-01.jpg" alt="AVATAR">
          </div>

          <span class="login100-form-title p-t-20 p-b-45">
            John Doe
          </span>

          <div class="wrap-input100 validate-input m-b-10" data-validate = "Email is required">
            <input class="input100" type="text" name="email" id="email" placeholder="Email">
            <span class="focus-input100"></span>
            <span class="symbol-input100">
              <i class="fa fa-user"></i>
            </span>
          </div>

          <div class="wrap-input100 validate-input m-b-10" data-validate = "Password is required">
            <input class="input100" type="password" name="password" id="password" placeholder="Password">
            <span class="focus-input100"></span>
            <span class="symbol-input100">
              <i class="fa fa-lock"></i>
            </span>
          </div>

          <div class="container-login100-form-btn p-t-10">
            <input type="button" value="Login" class="login100-form-btn" onclick="Validate()">
          </div>

          <div class="text-center w-full p-t-25 p-b-80">
            <a href="#" class="txt1">
              Forgot Username / Password?
            </a>
          </div>

        </form>
      </div>
    </div>
  </div>

<!--===============================================================================================-->
  <script src="~/vendor/jquery/jquery-3.2.1.min.js"></script>
<!--===============================================================================================-->
  <script src="~/vendor/bootstrap/js/popper.js"></script>
  <script src="~/vendor/bootstrap/js/bootstrap.min.js"></script>
<!--===============================================================================================-->
  <script src="~/vendor/select2/select2.min.js"></script>
<!--===============================================================================================-->
  <script src="~/js/main.js"></script>

</body>
</html>
Run your project & go to http://localhost:8080/Account/Login (your port can be different)
Creating Models
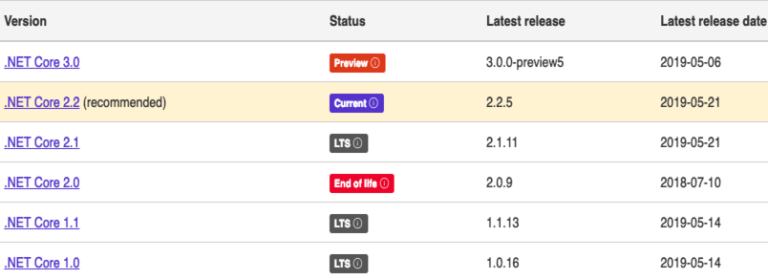
Now you need to create models for your Database table.
Here’s my table for users to login
I’m using Database First approach to create Models from my existing Database, so If you have also created your Database & want to create models then I’ll recommend you this Article to Scaffold your Database or follow this:
Scaffolding Database
My default .Net Core version is 2.2. So, I have created my project in 2.2.
Add Pomelo Nuget Package, your project compatible version.
dotnet add package Pomelo.EntityFrameworkCore.MySql
For EntityFramework Core Commands, add the line below to your project configuration file DotNetCoreMySQL.csproj
<ItemGroup>
    <DotNetCliToolReference Include="Microsoft.EntityFrameworkCore.Tools.DotNet" Version="2.0.3" />
    <PackageReference Include="Microsoft.EntityFrameworkCore.Design" Version="2.2.6" />
</ItemGroup>
run this command
dotnet restore
Now run the scaffold command to create Models from Database
dotnet ef dbcontext scaffold "Server=localhost;User Id=root;Password=1234;Database=hospital_db" "Pomelo.EntityFrameworkCore.MySql" -c MyDbContext -o Models
Your Models will be created. I recommend you first to create Models Folder and scaffold your Database there.
Validate User
Now you need a method to validate user from Database.
Update your “AccountController.cs” with this Code:
using Microsoft.AspNetCore;
using Microsoft.AspNetCore.Hosting;
using Microsoft.AspNetCore.Mvc;
using AdminPanelTutorial.Models;

namespace AdminPanelTutorial
{
    public class AccountController : Controller
    {
        MyDbContext db = new MyDbContext();
        public IActionResult Login()
        {
            return View();
        }

        public ActionResult Validate(Admins admin)
        {
            var _admin = db.Admins.Where(s => s.Email == admin.Email);
            if(_admin.Any()){
                if(_admin.Where(s => s.Password == admin.Password).Any()){

                    return Json(new { status = true, message = "Login Successfull!"});
                }
                else
                {
                    return Json(new { status = false, message = "Invalid Password!"});
                }
            }
            else
            {
                return Json(new { status = false, message = "Invalid Email!"});
            }
        }
    }
}
We’ll use ajax to validate our user from the Login Page.
So the last thing is our ajax call. Put this Code at the End of your Login.cshtml, before </Body> Tag
<script>

  function Validate() {

    $.ajax(
    {
      type: "POST",
      url: '@Url.Action("Validate", "Account")',
      data: {
        email: $('#email').val(),
        password: $('#password').val()
      },
      error: function (result) {
        alert("There is a Problem, Try Again!");
      },
      success: function (result) {
        console.log(result);
        if (result.status == true) {
          window.location.href = '@Url.Action("Index", "Home")';
        }
        else {
          alert(result.message);
        }
      }

    });
  }

</script>
Now run your project & Login with the email & password you have in your Admins Table.
I have saved Password without any Hashing just for keeping it simple. But keep in mind that this is a really bad practice. You should never save the password in your Database without hashing.
If you want to Hash password then follow this article => C# Hashing algorithm class
Or If you find any problem in this Tutorial, please do comment below & stay connected for the next part of this Tutorial.


MLM site database for me