Laravel 6 Stripe Payment Integration Tutorial
Stripe is the best software platform for running an internet business. Stripe builds the most powerful and flexible tools for internet commerce. Whether you’re creating a subscription service, an on-demand marketplace, an e-commerce store, or a crowdfunding platform, Stripe’s meticulously designed APIs and unmatched functionality help you create the best possible product for your users. Millions of the world’s most innovative technology companies are scaling faster and more efficiently by building their businesses on Stripe.
This article demonstrates that how can you integrate stripe in your Laravel 6 App. Stripe payment is easy to integrate and use. Stripe is a very simple and most powerful and flexible tool.
Prerequisites
- Node and NPM (Latest Versions)
- Latest PHP installed (>=7.3)
- Composer Dependency Manager. Download it from here.
Creating Laravel Project
In order to create a fresh installation of Laravel, open command prompt and type the following command:
composer create-project --prefer-dist laravel/laravel crudapp
The above given command will create a fresh installation of the Laravel project in your current directory in command prompt.
Install Stripe Package
For installing the stripe package in your current Laravel app, open the terminal your app’s directory and type the following command:
composer require cartalyst/stripe-laravel
After running the above command, you will need to register the provider and aliases. Goto app/config/app.php file and add the following:
In the providers array adds the following line:
Cartalyst\Stripe\Laravel\StripeServiceProvider::class
In the aliases array, add the following line:
'Stripe' => Cartalyst\Stripe\Laravel\Facades\Stripe::class
Setting secret credentials
Now open .evn file and set the secret credential provided by a stripe payment gateway. I have created a temporary account with a temporary email. For the sake of the tutorial, you can use the following:
STRIPE_KEY=pk_test_umkeHetjdz1MkkMgi79vxRNF001b1aHu6o
STRIPE_SECRET=sk_test_WFMlyRLCZFAIxh5KVe3UW2lo00jmAQSjX2
Let’s now setup the Stripe API key. It is done in the file config/services.php. Add/update the ‘stripe’ array:
Replace the STRIPE SECRET with your own.
Creating Routes
Open the web.php file which can be located at routes/web.php. Add the following routes:
 Route::get('/stripe', 'MyStripeController@index');
 Route::post('/store', 'MyStripeController@store');
Creating View
Add the following view file payment.blade.php in app/resources/views.
<!DOCTYPE html>
<html lang="en">
<head>
<title>Stripe Demo</title>
<meta charset="utf-8">
<meta name="viewport" content="width=device-width, initial-scale=1">
<meta name="csrf-token" content="{{ csrf_token() }}">
<link rel="stylesheet" href="https://maxcdn.bootstrapcdn.com/bootstrap/4.3.1/css/bootstrap.min.css">
<script src="https://ajax.googleapis.com/ajax/libs/jquery/3.4.1/jquery.min.js"></script>
<script src="https://cdnjs.cloudflare.com/ajax/libs/popper.js/1.14.7/umd/popper.min.js"></script>
<script src="https://maxcdn.bootstrapcdn.com/bootstrap/4.3.1/js/bootstrap.min.js"></script>
</head>
<body>
<div class="container">
<div class="row">
<div class="col-sm-12">
<div class="jumbotron text-center">
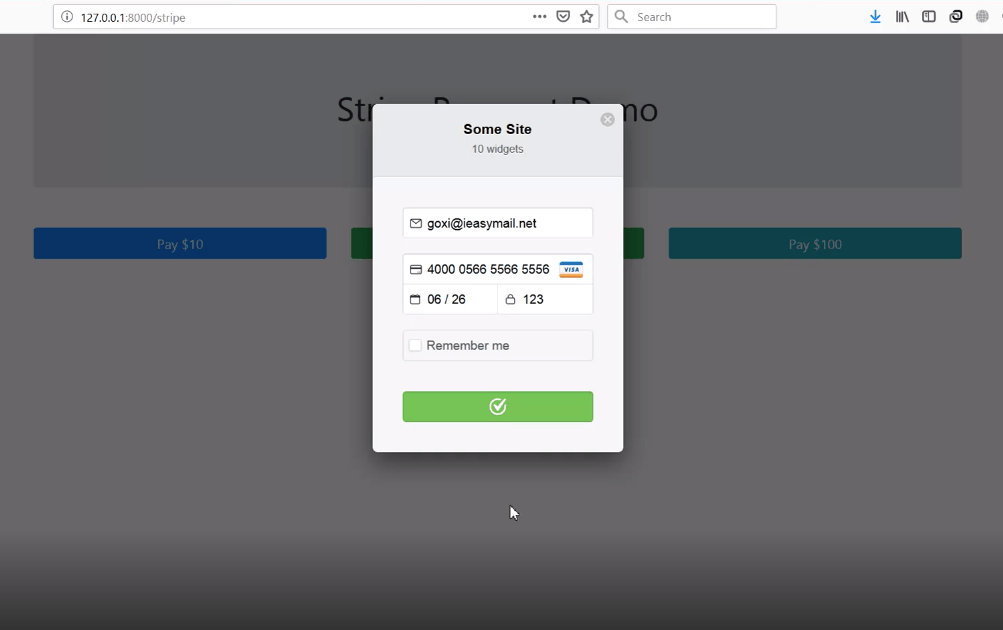
<h1>Stripe Payment Demo</h1>
</div>
</div>
</div>
<div class="row">
<div class="col-md-12"><pre id="token_response"></pre></div>
</div>
<div class="row">
<div class="col-md-4">
<button class="btn btn-primary btn-block" onclick="pay(10)">Pay $10</button>
</div>
<div class="col-md-4">
<button class="btn btn-success btn-block" onclick="pay(50)">Pay $50</button>
</div>
<div class="col-md-4">
<button class="btn btn-info btn-block" onclick="pay(100)">Pay $100</button>
</div>
</div>
</div>
<script src="https://checkout.stripe.com/checkout.js"></script>
<script type="text/javascript">
$(document).ready(function () {
$.ajaxSetup({
headers: {
'X-CSRF-TOKEN': $('meta[name="csrf-token"]').attr('content')
}
});
});
function pay(amount) {
var handler = StripeCheckout.configure({
key: 'pk_test_umkeHetjdz1MkkMgi79vxRNF001b1aHu6o', // your publisher key id
locale: 'auto',
token: function (token) {
// You can access the token ID with `token.id`.
// Get the token ID to your server-side code for use.
console.log('Token Created!!');
console.log(token)
$('#token_response').html(JSON.stringify(token));
$.ajax({
url: '{{ route('stripe.store') }}',
method: 'post',
data: { tokenId: token.id, amount: amount },
success: (response) => {
console.log(response)
},
error: (error) => {
console.log(error);
alert('There is an error in processing.')
}
})
}
});
handler.open({
name: 'Some Site',
description: '10 widgets',
amount: amount * 1500
});
}
</script>
</body>
</html>
Creating Controller
Create a controller with the following command:
php artisan make:controller MyStripeController
Replace with the following code:
<?php

namespace App\Http\Controllers;

use Illuminate\Http\Request;
use Redirect,Response;
use Stripe\Stripe;

class MyStripeController extends Controller
{

    /**
     * Display a listing of the resource.
     *
     * @return \Illuminate\Http\Response
     */
    public function index()
    {
        return view('payment');
    }


    /**
     * Store a newly created resource in storage.
     *
     * @param  \Illuminate\Http\Request  $request
     * @return \Illuminate\Http\Response
     */
    public function store(Request $request)
    {

        $stripe = Stripe::charges()->create([
            'source' => $request->get('tokenId'),
            'currency' => 'USD',
            'amount' => $request->get('amount') * 1500
        ]);

        return $stripe;
    }
}
Start the Server
Start the server by typing the following command:
php artisan serve
Go to 127.0.0.1/stripe and perform a transaction. See the following demo. Ignore the error, the request was successful.
In this way, you can integrate Stripe payment in your website.
Thank you for reading. If you find any difficulty, you can let me know in the comment section below.


What if the user decides to change the amount value in the javascript ?