Creating GUI Application in Python – TKINTER Tutorial
Graphical User Interface
A GUI (pronounced like “gooey”) allows the user to interact with the operating system using graphical elements such as icons, buttons, dialog boxes, inputs, etc. The interactions with GUI are mostly done with the help of small windows called dialog boxes. One part of the user interface consists of hardware devices such as mouse and keyboard. The other part of the user interface is the way the computer’s operating system accepts commands from the user. Interactive programs use GUI to take input from the user and display output.
The other way to interact with the computer’s operating system is by using commands. The user types the command in order to interact. It is done with the help of Command Line Interface (CLI).
Three Components of GUI Programming
There are mainly three components or fundamentals of GUI programming in Python:
- What to place on the screen? (Widgets)
- Where to place on the screen? (Geometry Management)
- How do widgets work? (Events and callback functions)
These three components are the core of making a simple GUI app in Python.
Let’s start learning how to develop GUI apps in Python.
Python’s tkinter module
Python provides a library to create GUI programs. tkinter is one of the libraries which provides a number of graphical components to implement GUI based programs. It is a library which means the Python language does not have GUI features built into the language, however, it is provided through a library.
In a GUI program, there is a window with various graphical widgets/components with which the user can interact. The Tkinter module provides 15 such components.
Tkinter Widgets
| Widget | Description |
| Button | A button performs action when clicked |
| Canvas | Canvas is a rectangular area which is used to display graphics |
| Entry | Singlie line input widget |
| Frame | Acts as a container to hold other widgets |
| Label | Displays line of text or an image. It is a read only widget, a user cannot interact with it |
| Listbox | It is a list from which user can select an item |
| Menu | A list of menu choices. It is displayed when the user clicks the Menubutton widget |
| Menubutton | A menu displayed on the screen. and can be clicked by the user. |
| Message | Message widget displays multiple textual lines |
| Radiobutton | Acts as a switchthat can be either selected or deselected |
| Scale | A slider to select a value by sliding along the track |
| Scrollbar | Provides the scrolling ability |
| Text | Multiple lines text input widget |
| Toplevel | A container which is displayed in its own window |
Root Window – Simplest GUI
The root window is just like a piece of paper on which you can draw graphical objects. The actual UI construction is pretty standardized. You create a root window, add widgets and then add functionality to widgets. Let’s bisect it in a bit more detail.
Following are the steps you are required to follow:
- Create a root window
- Add widgets to the root window
- Customize widgets
- The geometry of the widgets
- Bind event handlers to widget events
- Start the main event loop
Creating an empty window
Creating an empty window or root window or main window is very simple.
import tkinter
def main():
    #Create a root window
    root = tkinter.Tk()
    #Call the event loop
    root.mainloop()
#Call the function main
main()
The above-given piece of code will display the following output:
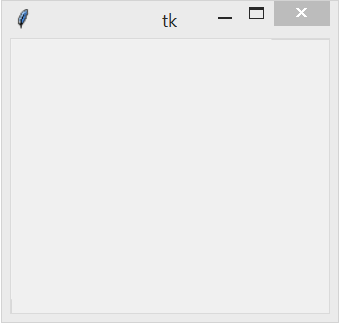
Let’s dissect the code line by line.
- On line # 1, there is an import statement which imports Python’s tkinter module. It imports all the methods, classes, and attributes of tkinter module into the current workspace.
- Then we defined a function named main() on line # 2.
- Inside the function’s body, on line # 4, we created an instance of tkinter’s Tk class which is a root window and assigned it to the variable root. Simply speaking, it is Tk class’s constructor method to create the main window.
- Line # 6 executed the mainloop function. This function runs like an infinite loop until you close the main window.
Adding widgets to root window
We have created our main or top-level or root window. Now we’ve to add components within it. These components, as previously described, are called Widgets. The basic syntax of creating widgets is as follows:
Syntax:
<var_name for widget> = WidgetName(its container window, its configuration options)
Adding a button
In this example, we will add a button to the root window/frame.
import tkinter

def main():
    #Create a root window
    root = tkinter.Tk()
    #Call the event loop
    root.mainloop()
    #create a button widget
    button = Button(root, text = "Click Me")
    button.pack()

#Call the function main
main()
button = tkinter.Button(root,text = “Click Me”)
button.pack()
Line#1: The code added a new instance(for the sake of simplicity I will call it an object) named button for the Button widget. The first parameter defined root as its container. The second parameter is a configuration parameter which configured its text option as “Click Me”
Line#2: We used the pack() method which is required to position the button widget within the window. A widget created must be packed.
Adding functionality to a button
We will write a callback function to add behavior to our button. A callback function is also known as an event handler because it handles the event that occurs when the user clicks the button.
After writing the event handler or callback function, we register it with the button. We provide one more configuration option while creating a button.
#callback function
def do_something():
    #the following line of code show messagebox
    tkinter.messagebox.showinfo('Response', 'You have clicked the button')
#create button
#add one more configuration option
#command = yourCallBackFunctionName
button = tkinter.Button(root, text = "Click Me", command = do_something)
Display Text with labels
You can use the Label widget to display text. Consider the following piece of code:
import tkinter

def main():
    #create the root window
    root = tkinter.Tk()
    #Create the label widget
    label = tkinter.Label(root, text = 'Hello World')
    another_label = tkinter.Label(root, text = 'This is GUI')
    #Call the pack method
    label.pack()
    another_label.pack()
    #enter the main loop
    tkinter.mainloop()

main()
The above code creates a label in the root window. pack() method accepts an optional argument named side. You can specify the side for the widget.
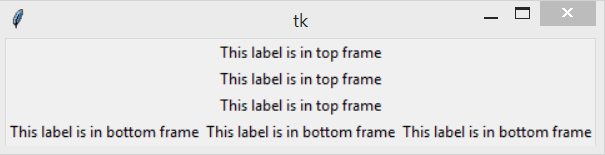
Organizing widgets using frames
A Frame acts like a container that can hold other widgets. You can use frames to organize the widgets in a window.
import tkinter

def main():
    #create root window
    root = tkinter.Tk()
    #Create two frames
    #One frame for the top of the window
    #Another frame for bottom of the window
    top_frame = tkinter.Frame(root)
    bottom_frame = tkinter.Frame(root)
    #Create three labels
    label1 = tkinter.Label(top_frame, text = 'This label is in top frame')
    label2 = tkinter.Label(top_frame, text = 'This label is in top frame')
    label3 = tkinter.Label(top_frame, text = 'This label is in top frame')

    #pack the labels that are in top frame
    #use side = 'top' to stack them on top of each other
    label1.pack(side = 'top')
    label2.pack(side = 'top')
    label3.pack(side = 'top')

    #create three labels for bottom_frame
    label4 = tkinter.Label(top_frame, text = 'This label is in bottom frame')
    label5 = tkinter.Label(top_frame, text = 'This label is in bottom frame')
    label6 = tkinter.Label(top_frame, text = 'This label is in bottom frame')

    #pack the labels that are in top frame
    #use side = 'left' to arrange them horizontally from left to right
    label4.pack(side = 'left')
    label5.pack(side = 'left')
    label6.pack(side = 'left')

    #Now pack the frames also
    top_frame.pack()
    bottom_frame.pack()

    tkinter.mainloop()
main()
The above given code is explained line by line in the comments. It would produce the following output:
Getting input with the entry widget
An Entry widget is a rectangular area that the user can type input into. You use the Entry widget’s get method to retrieve the data that has been typed into the widget.
We will create a simple Kilometers to Miles converter app. We will use object-oriented approach to create this app.
import tkinter
class KiloConverter:
    def __init__(self):
        #create root window
        self.root = tkinter.Tk()
        #Create two frames
        #One frame for the top of the window
        #Another frame for bottom of the window
        self.top_frame = tkinter.Frame(self.root)
        self.bottom_frame = tkinter.Frame(self.root)
        #Create two labels
        self.prompt_label = tkinter.Label(self.top_frame, text = 'Enter distance in Kilometers: ')
        self.entry = tkinter.Entry(self.top_frame, width = 10)
        #Pack top frame widgets
        self.prompt_label.pack(side = 'left')
        self.entry.pack(side = 'left')
        #Create the button widgets
        self.calc_button = tkinter.Button(self.bottom_frame, text = 'Convert', command = self.convert)
        #root.destroy exits/destroys the main window
        self.quit_button = tkinter.Button(self.bottom_frame, text = 'Quit', command = self.root.destroy)
        #Pack the buttons
        self.calc_button.pack(side = 'left')
        self.quit_button.pack(side = 'left')

        #Now pack the frames also
        self.top_frame.pack()
        self.bottom_frame.pack()

        tkinter.mainloop()
        #This method converts kilometers into miles
    def convert(self):
        kilo = float(self.entry.get())
        miles = kilo * 0.6214
        tkinter.messagebox.showinfo('Results', str(kilo)+ ' kilometers is equal to ' + str(miles) + ' miles')
gui = KiloConverter()
The convert method is the Convert button’s callback function. The statement in line 32 calls the entry widget’s get method to retrieve the data that has been typed into the widget. The value is converted to a float and then assigned to the kilo variable. The calculation in line 33 performs the conversion and assigns the results to the miles variable. Then, the statement in lines 34 through 35 displays the info dialog box with a message that gives the converted value.
These are some of the basics of GUI in Python.
Here’re some more related Articles:
— Best Python IDE and Code Editors