Developing Chat Application in Python with Source Code
The Chat Application is very common today offered either via a web application or mobile application. Learning to write a Chat Application is good for understanding many network communication concepts and can be useful to build other network applications. Chat Application provides communication between two parties i.e. sender and receiver. The sender is someone who initiates and send a message to other known as receiver; receiver at other end receives the message. The role of sender and receiver is not fixed and keep exchanging during communication, so in simple words, at a point, someone who sends the message is a sender and who receive the message is called receiver. In networking terms, sender and receiver are denoted as source and destination respectively.
Communication can be of many types depending upon the method of communication and the number of parties involved. Some of the scenarios are :
- Simplex or one-way communication: Only one party is able to send the message and other parties can only receive.
- Duplex or two-way communication: Both parties can send and receive messages.
Duplex communication is a common way of communication and can be one-to-one (simple chat) or many-to-many (chat room)
Generally, in real-world communication is done directly using voice in an ideal situation (distance between communicating parties, identification of parties) where sender speak out and the intended receiver respond after listening. So, what is the medium of communication here? Indeed, it is the air which helps our voice to travel to the receiver and successful communication depends upon air (high wind and long-distance can cause trouble). In online or digital communication the role of air is played by network channel (coaxial cable, fiber optics, etc.) and communication is controlled by a server. A server is a program which regulates the communication between sender and receiver.
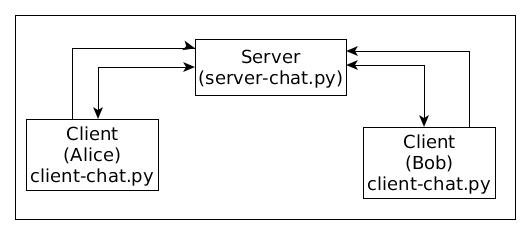
So, to create a Python Chat Application, one has to write a server program and client program/s (sender and receiver). Suppose, two parties Alice and Bob want to chat with each other and ask you to develop a chat application then being a developer you have to write a server program and a client program (different instance of the same program will be used by both Alice and Bob or even more users).
we will demonstrate the aforementioned scenario and will develop a Python Chat Application for Alice and Bob. Python has many modules which can help us to create network-related application, the socket is one of such popular default Python modules for low-level network programming. We will first list and explain the steps for server and client programs and then implement the same using Python.
Server script
Server program has all the logic to control and regulate the Chat, so most of the chat logic is implemented with a server program. So first step of communication is to identify the users, how server do this? In network communication, users are identified by a socket which is nothing but a combination of IP address and port address. So, for human understanding, Alice and Bob will be chatting but for a network, it is two sockets process which is sending and receiving bytes. Steps involved in this process is as follows:
- Create socket
- Communicate the socket address
- Keep waiting for an incoming connection request/s
- Connect to client
- Receive the message
- Decode the destination user and select the socket
- Send a message to the intended client
- Keep repeating step 5 & 6 as per users wish
- Exit i.e. end the communication by terminating the connection
Here’s the code for server-chat.py
import socket,select

port = 12345
socket_list = []
users = {}
server_socket = socket.socket(socket.AF_INET, socket.SOCK_STREAM)
server_socket.setsockopt(socket.SOL_SOCKET, socket.SO_REUSEADDR, 1)
server_socket.bind(('',port))
server_socket.listen(5)
socket_list.append(server_socket)
while True:
    ready_to_read,ready_to_write,in_error = select.select(socket_list,[],[],0)
    for sock in ready_to_read:
        if sock == server_socket:
            connect, addr = server_socket.accept()
            socket_list.append(connect)
            connect.send("You are connected from:" + str(addr))
        else:
            try:
                data = sock.recv(2048)
                if data.startswith("#"):
                    users[data[1:].lower()]=connect
                    print "User " + data[1:] +" added."
                    connect.send("Your user detail saved as : "+str(data[1:]))
                elif data.startswith("@"):
                    users[data[1:data.index(':')].lower()].send(data[data.index(':')+1:])
            except:
                continue

server_socket.close()
Client script
Client script is run by the user, so the same client code will be run by a different user but each will have a separate socket so they will have their unique communication channel. Client script uses to be thin because it has very less work i.e. it only connect with the server and send and receive messages. The steps involved in client script are:
- Create a unique client socket per instance/user
- Connect to the server with given socket address (IP and port)
- Send and receive messages
- Repeat step 3 as per configuration
- Close the connection
Here’s the Code for client-chat.py
import socket

client_socket = socket.socket()
port = 12345
client_socket.connect(('127.0.0.1',port))

#recieve connection message from server
recv_msg = client_socket.recv(1024)
print recv_msg

#send user details to server
send_msg = raw_input("Enter your user name(prefix with #):")
client_socket.send(send_msg)


#receive and send message from/to different user/s

while True:
    recv_msg = client_socket.recv(1024)
    print recv_msg
    send_msg = raw_input("Send your message in format [@user:message] ")
    if send_msg == 'exit':
        break;
    else:
        client_socket.send(send_msg)

client_socket.close()
In the above program, each user has to run the client script separately after the server script is running. Once the client program connects to the server the client has to register itself as a user by giving a username, so the rest of the communication will be done using the username.

Steps for running the sample Chat application:
1. Open a terminal and Run the server-chat.py
2. Open a new terminal and run client-chat.py
a) Enter the username with a ‘#’ prefix. Example: #alice
b) Now, send the message to a user by following the format @username:message. Example: @bob:Hello, Bob! This is alice
3. Repeat step 2 for other users. (Maximum 5 users is allowed with server configuration i.e. server_socket.listen(5)
Limitations:
This demo on Python Chat Application has limited capabilities like the user get the message only after both parties enter the message to each other. Proper user validation etc. is not done.
To Do:
- Test a simple cryptography feature.
- Add proper Authentication of the user.
Note: both scripts are based on various Internet sources.
I hope this article was helpful for you, please let me know in the comment section below.
Here’re some more Articles, you might be interested:
— Top 5 Python Web Frameworks to Learn


Where is the user specific messaging implemented?
why is the sock.recv hanging on windows 10